
Stampin' Up! - Watercolour Background Tutorial
Hello, all the Coffee & Cards ladies this week loved the easy watercolour background technique that we used to create our cards. We had a young lady join us who was so pleased with her card she wrote on the inside straight away and sealed the envelope ready for her brother's birthday!
If you weren't able to join us here is a quick step by step tutorial showing you how we made this simple and very effective background. This is what we did at Coffee & Cards but I thought I would try to recreate a seaside background instead!

Start by scribbling the Stampin' Write Markers of your choice onto the bottom half of an acrylic block. (I used Sahara Sand and Crumb Cake).

Then using Soft Sky and Pool Party, again scribble on the top half of the block.

Fill a Stampin' Spritzer with water and, holding approximately 4 inches away from the block, spray 4 or 5 times so that the ink colours become mobile.

Take the block and quickly place ink side down onto a piece of watercolour cardstock. Press firmly so that all the water and ink is transferred.
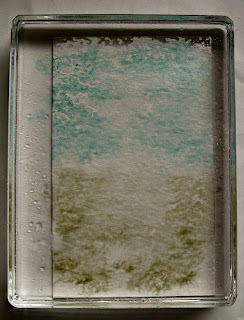
Lift the block carefully. If you have any puddles of water you can dab with a tissue to remove.

I placed a clear stamp block on top of my watercolour card to flatten it whilst it dried (it only takes a few minutes)!

I used a Basic Black Archival Stampin' Pad to stamp my image - just in case the watercolour card was still a little damp.

The horizon line on the stamp I used did not quite reach the edges of my watercolour panel so I used a Project Life Journaling Pen to cheat and extend the lines on each side!

I coloured in the images with the Stampin' Write Markers.

I also made a coordinating insert - I do like things to be finished off properly!

Some simple matting and layering and a die cut sentiment finish off this clean, simple card.
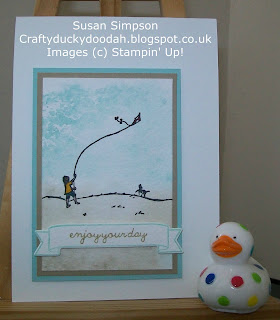
This is such a marvellous way to create a quick and effective background and, it turns out differently every time!
Thank you so much for looking at my Blog today, I hope you have a go at this simple technique - if the instructions don't make sense - please message me! I would love to see photos of what you make too.
If you don't have a Stampin' Up! Demonstrator I would love to be yours! If you don't have a catalogue and you would like one, please let me know and I will send one to you.
If you do need to order any supplies, simply use my “shop with me” button or click on the catalogue links on the right. Alternatively, contact me and I would be happy to place your order for you.
All orders over £20 (excluding postage) will receive a little thank you from me if you use the current Hostess Code: JY2VTRCD (please remember to allow me to access your contact details otherwise I won't be able to contact you).
For orders over £150 please do not use the Hostess Code to ensure that you receive the benefits.
Happy crafting!
Susan xx


Comments
Post a Comment