
Stained Glass Technique
Hello in my last post I promised a quick step by step on the Stained Glass technique - here it is!
First, stamp your chosen image in Versamark ink onto vellum, add white Stampin' Emboss Powder. Carefully remove excess powder and heat with a heat tool.
You can either heat from the top, this gives a slightly uneven texture or, if you heat from underneath this gives a smoother result.
Punch out with the matching punch or trim carefully with scissors.

Turn to the reverse and colour using Stampin' Write Markers - I used Watermelon Wonder and Delightful Dijon. You don't need to be too neat when colouring, the embossing powder hides a multitude of sins!

When it is finished it should look something like this:
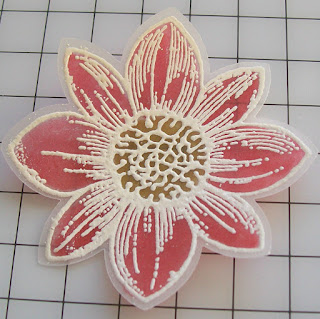
I like to give a little definition to my flowers so I use a foam mat and an embossing tool to gently shape.
I layered three flowers together to create my flower:

This technique is such a lovely way to add delicate colour to vellum, hopefully it makes sense, if not email me any questions.
Thanks for looking at my Blog, don't forget to check out the updated Weekly Deals (lovely ribbons and some framelits too this week).
Details of products I used can be found below.
Susan xx
First, stamp your chosen image in Versamark ink onto vellum, add white Stampin' Emboss Powder. Carefully remove excess powder and heat with a heat tool.
You can either heat from the top, this gives a slightly uneven texture or, if you heat from underneath this gives a smoother result.
Punch out with the matching punch or trim carefully with scissors.

Turn to the reverse and colour using Stampin' Write Markers - I used Watermelon Wonder and Delightful Dijon. You don't need to be too neat when colouring, the embossing powder hides a multitude of sins!

When it is finished it should look something like this:

I like to give a little definition to my flowers so I use a foam mat and an embossing tool to gently shape.

This technique is such a lovely way to add delicate colour to vellum, hopefully it makes sense, if not email me any questions.
Thanks for looking at my Blog, don't forget to check out the updated Weekly Deals (lovely ribbons and some framelits too this week).
Details of products I used can be found below.
Susan xx


Comments
Post a Comment