
Rectangular Box Card - Tutorial
Hello, I received so many lovely comments on various facebook groups that I posted a photo of the card I made earlier this week and have had several requests to do a tutorial on how I put it together so here it is - apologies for all the photographs!
Start with a piece of cardstock that measures 29cm x 10.5cm
Score along the long side at: 3cm, 7cm, 16cm and 20cm
Score along the short side at: 4cm but if possible, leave the last 9cm panel unscored. This will help the keep the back panel straight but if you forget, it is not vital!
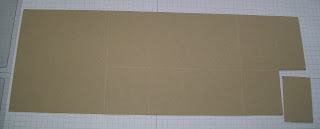
Fold and crease all the score lines. The deep section is the base so you will need to remove the 3cm tab to assemble the box.
Cut down the remaining scored lines along the long edge.

Apply adhesive (I used red line tape) to the end tab and stick together form the box shape.
Cut two strips of cardstock 11 cm x 2 cm and score at 1cm on each end.
Fold the two narrow strips on each score line to create a 'Z' shape. Apply adhesive (this time I used Tombow) to stick the strips in place.

This card will fold flat for posting so, whilst holding the strips in place, test the folds to see if the box folds flat properly before the glue sets. (The first box I made did not fold flat)!!!

I then cut panels of DSP for each section 5mm smaller and stuck in place.
I also cut a panel of cardstock for the reverse so that I would have something to write on, this was also 5mm smaller.

Now the fun part - I stamped out lots of animals!
For the lion (stamped in Hello Honey) I also stamped just the head in Tangerine Tango. I cut around the mane and curled the edges slightly before sticking down.

For the elephant I stamped in Smoky Slate first and then used Pool Party to stamp out just the ear. I cut it out and left a small tab so that I could fold it back and stick over the grey ear.

Once all the animals are ready take a small strip of Window Sheet (approx 5mm wide) and stick to the backs of the animals. This makes it easier to stick to the struts. I spent ages deciding on the placement of my little zoo babies and then to finish off I used the small pearls for eyes.
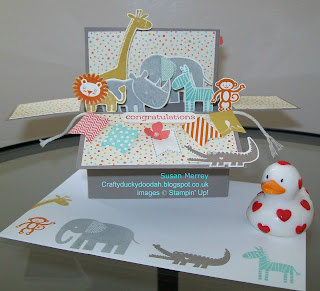
This card will fit inside a standard C6 SU envelope, just be careful to make sure nothing sticks up too far i.e. the giraffe's head in this case otherwise you will end up with a strangely folded over envelope top like me!
Here is the finished card again:
This is the first box card that I made to celebrate my daughter's 21st birthday back in May:

Sorry again for the number of photos in this post; I really hope that these instructions make sense - if not please let me know!
Thanks for looking at my Blog today - I would love to see your Rectangular Box Card creations.
Susan xx
Start with a piece of cardstock that measures 29cm x 10.5cm
Score along the long side at: 3cm, 7cm, 16cm and 20cm
Score along the short side at: 4cm but if possible, leave the last 9cm panel unscored. This will help the keep the back panel straight but if you forget, it is not vital!

Fold and crease all the score lines. The deep section is the base so you will need to remove the 3cm tab to assemble the box.
Cut down the remaining scored lines along the long edge.

Apply adhesive (I used red line tape) to the end tab and stick together form the box shape.
Cut two strips of cardstock 11 cm x 2 cm and score at 1cm on each end.
Fold the two narrow strips on each score line to create a 'Z' shape. Apply adhesive (this time I used Tombow) to stick the strips in place.

This card will fold flat for posting so, whilst holding the strips in place, test the folds to see if the box folds flat properly before the glue sets. (The first box I made did not fold flat)!!!

I then cut panels of DSP for each section 5mm smaller and stuck in place.
I also cut a panel of cardstock for the reverse so that I would have something to write on, this was also 5mm smaller.

Now the fun part - I stamped out lots of animals!
For the lion (stamped in Hello Honey) I also stamped just the head in Tangerine Tango. I cut around the mane and curled the edges slightly before sticking down.

For the elephant I stamped in Smoky Slate first and then used Pool Party to stamp out just the ear. I cut it out and left a small tab so that I could fold it back and stick over the grey ear.

Once all the animals are ready take a small strip of Window Sheet (approx 5mm wide) and stick to the backs of the animals. This makes it easier to stick to the struts. I spent ages deciding on the placement of my little zoo babies and then to finish off I used the small pearls for eyes.
This card will fit inside a standard C6 SU envelope, just be careful to make sure nothing sticks up too far i.e. the giraffe's head in this case otherwise you will end up with a strangely folded over envelope top like me!
Here is the finished card again:

This is the first box card that I made to celebrate my daughter's 21st birthday back in May:

Sorry again for the number of photos in this post; I really hope that these instructions make sense - if not please let me know!
Thanks for looking at my Blog today - I would love to see your Rectangular Box Card creations.
Susan xx


Comments
Post a Comment