
Stampin' Up! - Cake Soiree for Stamp 'N Hop
Hello and welcome to the first ever Stamp N' Hop! We are a group of demonstrators from around the world who are sharing projects and inspiration featuring products in the Spring / Summer Catalogue.

If you have hopped over from Jessie, welcome - wasn't her project lovely? If you haven't visited my blog before, my name is Susan - I am an Stampin' Up! Demonstrator based in the UK (Cambridgeshire) and I have been with SU for three wonderful years! Why not grab a cuppa and hop around with us?
It was a very difficult choice to decide which products to use for my project - I am a Libran; decisions are hard for me! Eventually I decided to use the Sweet Soiree Suite.
I chose the colours for my project from a piece of Designer Series Paper (DSP). If you have ever bought DSP from Stampin' Up! you will know that on the reverse of each pack is a list of colours used on the papers - this is so useful!
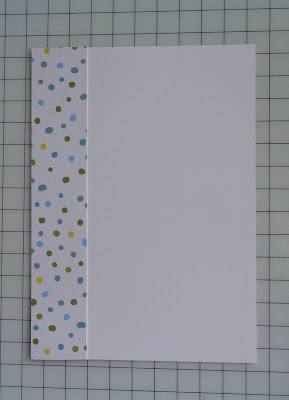
I started with the background, adhering a piece of DSP onto some Whisper White card.
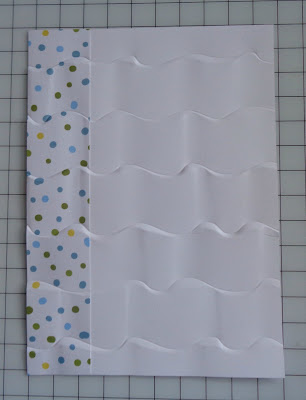
I then ran this piece through the Ruffled Dynmaic embossing folder - this is the first time I have used this folder - it won't be the last time, love the texture and deep impression it gives.
I knew I wanted to use the gorgeous die cut tag but after cutting out a selection of flowers and foliage I realised that there would be no room for a sentiment.
Top Tip Number 1
Did you know you can 'extend' dies to make longer pieces? Well, you can!
I started with a piece of card in Marina Mist Card measuring 4.8 x 8.5cm. Place the die at the top of the card and lay on the Big Shot platform. Turn the handle as normal but only allow the top half of the die to cut - reverse the big shot at this point.
Remove the die and place at the bottom of the piece of card, turning so that this end will cut when you turn the handle. Run through the Big Shot as before and reverse. Et voila - one large tag!

After stamping a sentiment on the white tag I used Stampin' Dimensionals to adhere it to the Marina Mist one. I spent some time arranging an assortment of flowers and foliage on the tag using a mixture of Tombox and Dimensionals.

I added Wink of Stella to the flowers for a bit of sparkle - hopefully you can see it on the photo below.

All I needed now was some coordinating ribbon for the top of the tag. Unfortunately SU are not currently offering any sort of trim in Marina Mist but, a solution was at hand!
Top Tip Number 2
Did you know that you can colour ribbons and trims to match your projects? Well you can!
I used a Stampin' Write Marker to colour some the lovely white organza ribbon. If you use a marker you need to allow time for the ink on the ribbon to dry. You can also use Stampin' Blends in the same way and, as they are alcohol based, the ribbon dries much quicker!

The inside of the card and the envelope were also decorated with DSP and die cut elements so that everything coordinated.

Here is the finished card and envelope.

I really enjoyed creating this project - I can see this set becoming my go to set for birthdays, weddings and other celebrations. In fact, I enjoyed using Cake Soiree so much that we will be using it next week for Coffee & Cards sessions. Pop back soon to see more projects made with this versatile bundle.
Thanks for joining us on the very first Stamp 'N Hop - click the 'Next' button to head on over to see what Shannon has been doing. If you get lost along the way, a list of hop participants can be found below.
You can find details of the products I used for this project below, if you have any questions, please get in touch - I am always happy to help.
Don't forget to leave comments - we would all love to know what you think of our projects!
Happy Crafting!
Susan xx

Thank you so much for looking at my Blog today, if you don't have a Stampin' Up! Demonstrator I would love to be yours! If you don't have a copy of any of the current catalogues and you would like one, please let me know and I will send one to you straight away.
If you need to order any supplies, simply use my “shop with me” button or click on the catalogue links on the right. Alternatively, contact me and I would be happy to place an order for you.
Would you like to receive a FREE gift from me? All orders placed directly with me or online receive a handmade card from me as a thank you but did you know that all orders over £20 (excluding postage) will receive a gift from me too? If you use the current Hostess Code: BTX4RMZJ I will pop something in with your order or post directly to you, (please remember to allow me to access your contact details otherwise I won't be able to contact you).
For orders over £150 please do not use the Hostess Code to ensure that you receive the benefits - you will still receive a gift from me too!
Please click on the images below to go straight to my online store if you are in the UK.


If you have hopped over from Jessie, welcome - wasn't her project lovely? If you haven't visited my blog before, my name is Susan - I am an Stampin' Up! Demonstrator based in the UK (Cambridgeshire) and I have been with SU for three wonderful years! Why not grab a cuppa and hop around with us?
It was a very difficult choice to decide which products to use for my project - I am a Libran; decisions are hard for me! Eventually I decided to use the Sweet Soiree Suite.
I chose the colours for my project from a piece of Designer Series Paper (DSP). If you have ever bought DSP from Stampin' Up! you will know that on the reverse of each pack is a list of colours used on the papers - this is so useful!
I started with the background, adhering a piece of DSP onto some Whisper White card.

I then ran this piece through the Ruffled Dynmaic embossing folder - this is the first time I have used this folder - it won't be the last time, love the texture and deep impression it gives.

I knew I wanted to use the gorgeous die cut tag but after cutting out a selection of flowers and foliage I realised that there would be no room for a sentiment.
Top Tip Number 1
Did you know you can 'extend' dies to make longer pieces? Well, you can!
I started with a piece of card in Marina Mist Card measuring 4.8 x 8.5cm. Place the die at the top of the card and lay on the Big Shot platform. Turn the handle as normal but only allow the top half of the die to cut - reverse the big shot at this point.
Remove the die and place at the bottom of the piece of card, turning so that this end will cut when you turn the handle. Run through the Big Shot as before and reverse. Et voila - one large tag!

After stamping a sentiment on the white tag I used Stampin' Dimensionals to adhere it to the Marina Mist one. I spent some time arranging an assortment of flowers and foliage on the tag using a mixture of Tombox and Dimensionals.

I added Wink of Stella to the flowers for a bit of sparkle - hopefully you can see it on the photo below.

All I needed now was some coordinating ribbon for the top of the tag. Unfortunately SU are not currently offering any sort of trim in Marina Mist but, a solution was at hand!
Top Tip Number 2
Did you know that you can colour ribbons and trims to match your projects? Well you can!
I used a Stampin' Write Marker to colour some the lovely white organza ribbon. If you use a marker you need to allow time for the ink on the ribbon to dry. You can also use Stampin' Blends in the same way and, as they are alcohol based, the ribbon dries much quicker!

The inside of the card and the envelope were also decorated with DSP and die cut elements so that everything coordinated.

Here is the finished card and envelope.

I really enjoyed creating this project - I can see this set becoming my go to set for birthdays, weddings and other celebrations. In fact, I enjoyed using Cake Soiree so much that we will be using it next week for Coffee & Cards sessions. Pop back soon to see more projects made with this versatile bundle.
Thanks for joining us on the very first Stamp 'N Hop - click the 'Next' button to head on over to see what Shannon has been doing. If you get lost along the way, a list of hop participants can be found below.
You can find details of the products I used for this project below, if you have any questions, please get in touch - I am always happy to help.
Don't forget to leave comments - we would all love to know what you think of our projects!
Happy Crafting!
Susan xx
Susan
Simpson you are here!
Linda
Richenberg Thank you so much for looking at my Blog today, if you don't have a Stampin' Up! Demonstrator I would love to be yours! If you don't have a copy of any of the current catalogues and you would like one, please let me know and I will send one to you straight away.
If you need to order any supplies, simply use my “shop with me” button or click on the catalogue links on the right. Alternatively, contact me and I would be happy to place an order for you.
Would you like to receive a FREE gift from me? All orders placed directly with me or online receive a handmade card from me as a thank you but did you know that all orders over £20 (excluding postage) will receive a gift from me too? If you use the current Hostess Code: BTX4RMZJ I will pop something in with your order or post directly to you, (please remember to allow me to access your contact details otherwise I won't be able to contact you).
Please click on the images below to go straight to my online store if you are in the UK.


love the colours. so pretty
ReplyDeleteThank you Terry - not used Marina mist for ages!
DeleteSusan, Lovely card! I love the color combination! Thanks for sharing!
ReplyDeleteThank you Shannon.
DeleteLove the embossed background!
ReplyDeleteThank you Danielle, me too!
DeleteLove your card and the way you made 2 tags of differing lengths with the same die and as soon as my brain warms up, I'm going to have to see if i can do it too!
ReplyDeleteThanks Tracey - hope the instructions made sense! Good luck :)
DeleteI love the Sweet Soiree set so thank you for the inspiration!
ReplyDeleteThanks for commenting - Sweet Soiree is so pretty isn't it
DeleteVery pretty card, well done!
ReplyDeleteThank you Ilka.
Deletebeautiful card and great photos! thank you for the tip to colour the ribbon! what a brilliant idea.
ReplyDeleteThank you Eva.
DeleteOh wow such a great and beautiful card. Thanks so much for sharing and giving us some new techniques to try too!
ReplyDeleteThank you Christina - hope you give them a try soon.
DeleteThat color combo is fabulous! I love the simplicity of the design, yet so beautifully put together!
ReplyDeleteThank you Kayla - I don't often reach for these colours, I was surprised at how well they looked together!
DeleteWhat a lovely birthday card, Susan. I am definitely adding it to my list of cards to case!
ReplyDeleteThank you Tracie - CASE away!
DeleteBeautifl card Susan! I love the soft and subtle colors that you used.
ReplyDeleteThank you Lisa, not my normal colour choice but I loved it too!
DeleteBeautiful card! Great use of colors!
ReplyDeletethank you.
DeleteLovely card! I love all the details you've added to make this project. Thanks for sharing!
ReplyDeleteThank you Melissa - it is the little details that matter and make a project stand out don't you think?
DeleteGreat card, lots of details
ReplyDeletethanks you.
DeleteSuch a great tip for extending your dies!
ReplyDeleteThank you Pryl - hope the instructions made sense. Perhaps I should think about a video?
DeleteLove your card, and wow that embossing folder - looks like fabric, thank you for sharing, Laura x
ReplyDeleteThank you Laura - the folder is fantastic, so much dimension and texture with a simple pass through the Big Shot - love it!
DeleteReally pretty doubling the tag & ruffles over the DSP xx
ReplyDeleteThank you Jessie, embossing the DSP too made a real difference to this project. My prototype did not look quite as nice with =out it!
DeleteOh my goodness - Your card is simply gorgeous! Thank you so much for providing such great directions and tips. I don't have the Ruffles dynamic EF (yet!). It is now on my list. The layering that you did on the front of the card is so pretty, and the inside of the card is great. Hopefully, you don't mind if I CASE :) Looking forward to "seeing" you next month on the blog hop.
ReplyDeleteThank you Laurie, CASE away with pleasure - see you next month! :)
DeleteSuch a lovely card Susan, love that you used the tag rather than the cake and adore the colour combo you have chosen. x
ReplyDeleteThank you Mo - the tag is so pretty and very useful once I figured out how to make it longer (it took a while)! xx
DeleteGorgeous card Susan. Really love your colour combination and all the little added details.
ReplyDeleteThanks Kirsten. I must remember to pull these colours out more often!
DeleteBeautiful card Susan. I love your use of the Embossing Folder over the DSP panel and the double layer tag. Lovely detail. TFS and great hopping with you x
ReplyDeleteThanks Mikaela, I was pleased with how the DSP looked when embossed. xx
DeleteGreat card. That ruffled embossing folder adds the perfect touch!
ReplyDeleteThank you Joanne - I was pleased with how it turned out. I must try this with some other folder too ...
DeleteThanks everyone for all the lovely comments xx
ReplyDeleteSuch an adorable idea, Thanks For Sharing it. gifts to pakistan
ReplyDelete