
Welcome Easter - Hopping Around the World
Hello and welcome to another Hopping Around The World blog hop. We are a group of demonstrators who just love to share our passion for paper crafting. If you are starting here with me in the UK or hopping over from Tanja in Austria, welcome; grab a cuppa and hop around the world with us!

This month our theme is Easter and I have chosen to use a lovely stamp set called Welcome Easter.

How cute are the images in this set - just perfect for any Spring themed project. The greetings include sentiments for Easter and new babies and the line art images are great for basic stamping techniques. Perfect for customising and colouring using a variety of mediums makes this a very versatile stamp set.
So, on with my project. My first dilemma; which image to use for my project and, of course I am cutting it close to the deadline with my submission for the hop again!
I decided to keep the colour palette fairly simple as I wanted the image to take centre stage.

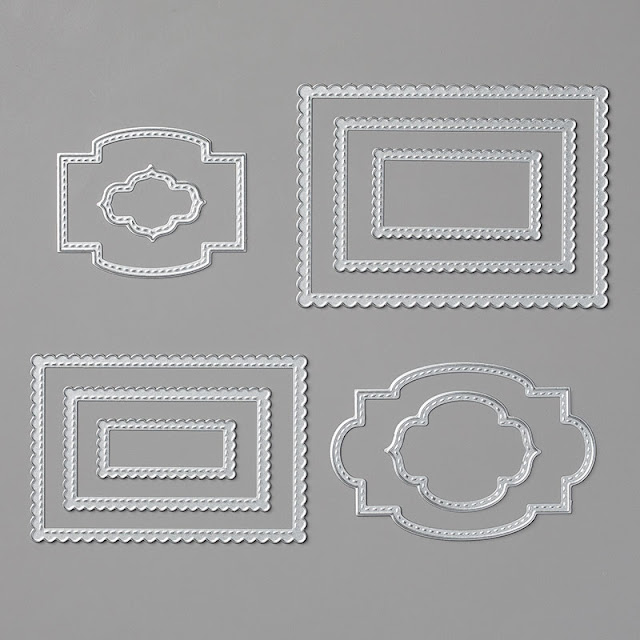
If you craft with me or follow my blog, I'm sure you know that I love stitched edge dies. I was so excited when my latest delivery arrived this week - have you seen these? They're called the Stitched So Sweetly Dies and I love them already. In fact, we will be using them for Coffee & Cards sessions next week too!
To create the Welcome Easter card
I used the ww note cards and envelopes for my project.
To create a panel for the stamped image I used my new favourite dies.
I used a piece of thick ww card and adhered a piece of DSP across the bottom with Tombow.
Top Tip
Leave the panel for a few minutes before die cutting to allow the glue to settle and adhere completely - it makes die cutting much easier, trust me!

I took care to place the die so that was a black stripe on each end for a balanced look.

You could always adhere the DSP directly to the die cut panel and trim if you prefer but I didn't want to lose the stitched edges.
Now for some stamping!
I used Mint Macaron ink to stamp a row of grass just above the DSP. I squiggled a little ink from the Mint Macaron Stampin' Blend to fill each image.
I stamped a cute buzzy bee and coloured with a Daffodil Delight Stampin' Blend.
To create the rabbit
I used thick ww card and Memento ink. There are no coordinating dies with this stamp set but the images are fairly easy to fussy cut out.
I wanted to colour the rabbit but did not want a heavy look so I used an outline only colouring technique which is simple but effective.

I used the Crumb Cake light and dark blends. I started with the light pen and outlined the rabbit and used the dark pen to add detail where I thought there should be shade. I then used the colour lifter to go over all the Crumb Cake lines I had drawn to soften the edges.
You can just see (hopefully) in the photo above that I added some pink to his cheeks, inner ears, nose feet. I coloured over the cheeks with the Colour Lifter too as I didn't want the rabbit to look too flushed!
To assemble the Welcome Easter card
I adhered a piece of the lovely Mint Macaron Sheer Linen Ribbon around the panel and then adhered the panel to the card with dimensionals. The rabbit has also been adhered with dimensionals.
I used a rolled up glue dot to add a tiny bow as a finishing touch.
Here is the completed card and envelope. I stamped and coloured a little bee on the flap.

I added a sentiment to the inside and another of those cute little bees.

Of course I didn't stop with just the rabbit, I had to use the other images too didn't I?

I used the same outline colouring technique for all three animals but of course, you could always colour them in fully for a different look.
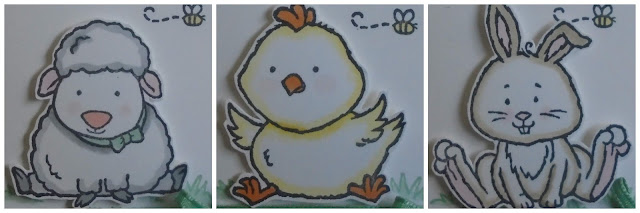
I have to confess that I am not that into sending Easter cards however, my Aunty Doreen is so I will be gifting this cute trio to her. I have a feeling she will be sending these cards to her great grandchildren!
Next up is the lovely Maureen Rachfuss from the USA. If you get lost along the way, details of hop participants can be found below.
Thanks for hopping along with us, don't forget to leave comments to let us know what you think of our projects.
Susan xx
Hop Participants
If you need to order any supplies, simply use my “shop with me” button or click on the catalogue links on the right. Alternatively, contact me and I would be happy to place an order for you.
If you would like copies of either of the current catalogues let me know and I will pop them in the post for you. If you prefer, you can view online versions by clicking the links to the right of this post. The Spring/Summer and Sale-A-Bration catalogues are now available - please message me if you would like copies.

Would you like to receive a FREE gift from me?
All orders placed directly with me or online receive a handmade card from me as a thank you but did you know that all orders over £20 (excluding postage) will receive a gift from me too? If you use the current Hostess Code I will pop something in with your order or post directly to you. (Please remember to allow me to access your contact details otherwise I won't be able to contact you).

If your order is over £150 please don't use the code as you will receive your own Stampin' Rewards. You will still receive a card and a gift from me.
If you are local to me and can collect, I’m happy for you to piggyback one of my orders to save on postage.
If you have any questions, or need help with anything I’m always happy to help. You can email me susan_merrey@yahoo.co.uk or telephone 07905 403 823.
Thank you for shopping with me and supporting my business!


This month our theme is Easter and I have chosen to use a lovely stamp set called Welcome Easter.

How cute are the images in this set - just perfect for any Spring themed project. The greetings include sentiments for Easter and new babies and the line art images are great for basic stamping techniques. Perfect for customising and colouring using a variety of mediums makes this a very versatile stamp set.
So, on with my project. My first dilemma; which image to use for my project and, of course I am cutting it close to the deadline with my submission for the hop again!
I decided to keep the colour palette fairly simple as I wanted the image to take centre stage.

If you craft with me or follow my blog, I'm sure you know that I love stitched edge dies. I was so excited when my latest delivery arrived this week - have you seen these? They're called the Stitched So Sweetly Dies and I love them already. In fact, we will be using them for Coffee & Cards sessions next week too!

To create the Welcome Easter card
I used the ww note cards and envelopes for my project.
To create a panel for the stamped image I used my new favourite dies.
I used a piece of thick ww card and adhered a piece of DSP across the bottom with Tombow.
Top Tip
Leave the panel for a few minutes before die cutting to allow the glue to settle and adhere completely - it makes die cutting much easier, trust me!

I took care to place the die so that was a black stripe on each end for a balanced look.

You could always adhere the DSP directly to the die cut panel and trim if you prefer but I didn't want to lose the stitched edges.
Now for some stamping!
I used Mint Macaron ink to stamp a row of grass just above the DSP. I squiggled a little ink from the Mint Macaron Stampin' Blend to fill each image.
I stamped a cute buzzy bee and coloured with a Daffodil Delight Stampin' Blend.
To create the rabbit
I used thick ww card and Memento ink. There are no coordinating dies with this stamp set but the images are fairly easy to fussy cut out.
I wanted to colour the rabbit but did not want a heavy look so I used an outline only colouring technique which is simple but effective.

I used the Crumb Cake light and dark blends. I started with the light pen and outlined the rabbit and used the dark pen to add detail where I thought there should be shade. I then used the colour lifter to go over all the Crumb Cake lines I had drawn to soften the edges.
You can just see (hopefully) in the photo above that I added some pink to his cheeks, inner ears, nose feet. I coloured over the cheeks with the Colour Lifter too as I didn't want the rabbit to look too flushed!
To assemble the Welcome Easter card
I adhered a piece of the lovely Mint Macaron Sheer Linen Ribbon around the panel and then adhered the panel to the card with dimensionals. The rabbit has also been adhered with dimensionals.
I used a rolled up glue dot to add a tiny bow as a finishing touch.
Here is the completed card and envelope. I stamped and coloured a little bee on the flap.

I added a sentiment to the inside and another of those cute little bees.

Of course I didn't stop with just the rabbit, I had to use the other images too didn't I?

I used the same outline colouring technique for all three animals but of course, you could always colour them in fully for a different look.

I have to confess that I am not that into sending Easter cards however, my Aunty Doreen is so I will be gifting this cute trio to her. I have a feeling she will be sending these cards to her great grandchildren!
Next up is the lovely Maureen Rachfuss from the USA. If you get lost along the way, details of hop participants can be found below.
Thanks for hopping along with us, don't forget to leave comments to let us know what you think of our projects.
Susan xx
Hop Participants
- Tanja Klingler-Selinger (AUSTRIA) - not this time
- Susan Simpson (UK) - you are here!
- Sheila Turner (Canada) - not this time
If you need to order any supplies, simply use my “shop with me” button or click on the catalogue links on the right. Alternatively, contact me and I would be happy to place an order for you.
If you would like copies of either of the current catalogues let me know and I will pop them in the post for you. If you prefer, you can view online versions by clicking the links to the right of this post. The Spring/Summer and Sale-A-Bration catalogues are now available - please message me if you would like copies.

Would you like to receive a FREE gift from me?

If your order is over £150 please don't use the code as you will receive your own Stampin' Rewards. You will still receive a card and a gift from me.
If you are local to me and can collect, I’m happy for you to piggyback one of my orders to save on postage.
If you have any questions, or need help with anything I’m always happy to help. You can email me susan_merrey@yahoo.co.uk or telephone 07905 403 823.
Thank you for shopping with me and supporting my business!


Oh Susan, so sweet! I too, love anything stitched!
ReplyDeleteI really love this card - the black and white stripes made it pop on the clean white - just might have to CASE it.
ReplyDeleteYour card is just too cute. I really love your style! And the worst I didn't know these dies. How could have missed them 🙈.
ReplyDeleteNice cards... I really live your idea
ReplyDeleteThis technique for the paper is simple but top. I Don t use it but I will do
ReplyDeleteLove these cards Susan and the die cut dsp just looks fab x
ReplyDeleteFabulous set of cards, Susan and I love your layout and colouring too. Thanks for sharing x
ReplyDelete