Quiet Meadow - Crafty Challenge Blog Hop
Hello and welcome to another Crafty Challenge Blog Hop - this month we are showcasing items from the newly launched Annual Catalogue!


If you are starting our hop here with me at Craftyducky HQ or have hopped over from Linda Moore - welcome, we have many fabulous projects to share using brand new items.
What a tough decision to decide which items to use for this hop - eventually I settled on a lovely stamp and die bundle called Quiet Meadow. Flowers, sentiments and background stamps, this bundle has them all and I absolutely love it. I have so manny plans and ideas for projects and workshops using it. The other reason I love this stamp set is that there is a splodgy, dotty image that reminds me of my all time favourite stamp set - Gorgeous Grunge.

Here is my project:
The inspiration for this project started when I came across a project on YouTube that had been designed by Cheri Stojkovitch. I tweaked the design a little a came up with this pretty card. Can you see the splodgy dots?

The colours I used:
You will need:
21 cm x 14.5 cm Basic White Thick (BWT) - scored at 10.5 cm
10 cm x 14 cm Watercolour Card
10 cm x 5 cm Watercolour Paper
10 cm x 5 cm Evening Evergreen
You will also need two sheets of Watercolour Paper to create the two background pieces.
The Background:
Oh boy, I do love getting inky! Create a watercolour background using the above colours and trim to measure 10 cm x 14 cm. I added some text using third generation Evening Evergreen ink and some splodges using stamped off Polished Pink. Don't worry too much about the bottom of the panel - there is a plan for this section below!

Take the two 5 cm panels of card and tear to create a torn edge on each piece. Adhere the two pieces together and then adhere to the background using Tombow. I then scuffed the edges of the panel.
Top Tip #1:
If you tear the cardstock towards yourself you will create a lovely multi layered effect.

Top Tip #2:
For even more texture along the tear lines, lift the torn edges with a finger nail or a poky tool, pulling upwards to lift the edges.
The die cutting:
Use the other piece of Watercolour Paper create another inky background. If you are impatient like me, dry with a heat tool! Cut a selection of flowers and butterflies. I didn't actually use the butterflies for my project but I am sure they will come in useful for another project soon!

To assemble:
Now for the fun part - arranging the flowers! I placed a mini glue dot in the centre of the torn panels and laid some of this lovely Soft Succulent ribbon on top. I left the ribbon on the real as I was not sure whether I wanted to tie a knot or a bow to complete my project.
At this point, I decided that my flowers did not have enough contrast with the background so I quickly die cut three of the taller, narrower stems from plain Watercolour Paper. I used tiny dabs of Tombow about an inch from the bottom of each stem to adhere to the background.

I then added the taller coloured flowers, again adhering with Tombow as above taking care to ensure that the stems were neat and tidy.

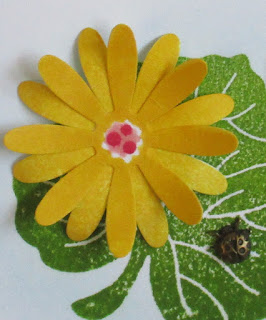
Next came the remaining flowers that I adhered slightly lower down to create a bouquet. Can you see the tiny centre of the flower in the middle below? Yes, there is a die for this piece too!!

I like to add elements to my projects that create depth and dimension as well as 'loose' pieces that can move and cast shadows. I did use a couple of mini dimensionals to support the centres of the final flowers and also used Tombow as above for the stems.

I decided to tie the ribbon in a knot but if you prefer you could tie a tiny bow instead.
The inside/envelope:
I used the text and splodge images as above to decorate the inside of the card and the envelope flap. I also stamped a sentiment as this project is already on its way to a friend who is quite poorly at the moment.

The completed project:
I love how this project turned out, the colours are so soft and pretty. This project would also look great made using stronger colours.

I got so carried away having so much fun with this project that I took masses of photographs. Far too many for a single post, so I decided to share my project here today and then I will post very soon to share the techniques I used to create the backgrounds. Thanks again to Cheri for the inspiration.
Next up is Alejandra Gomez in the USA who has a great project to share with us. A list of participants can be found below.
Thanks for hopping along with us - don't forget to leave comments as you hop around to let us know what you think of our projects.
Susan xx
Thank you so much for looking at my Blog today. Unfortunately I am no longer a Stampin' Up! Demonstrator. SU regulations are very strict; I have to wait 3 whole months before I can rejoin again.
If you would like a copy of either of the current Annual Catalogue just let me know and I will arrange for a copy to be sent to you.


 Open Weave Ribbon")


love your card! this is a really nice Bundle!
ReplyDeleteThanks Alejandra - it is my favourite! xx
DeletePretty card x
ReplyDeleteThanks Karen xx
DeleteI love that background!
ReplyDeleteThanks Canid - it was fun to create!
DeleteBeautiful card Susan, Thanks for sharing.
ReplyDeleteThank you, great hopping with you again.
DeleteSuch a beautiful card!
ReplyDeleteThank you Nina.
Delete