
Stampin' Up! Easter Treat Holder - tutorial
Hello, I had such a lovely afternoon yesterday creating lots of little treats for Easter. I was asked by one of my Coffee & Cards ladies if I could show her how to make one - so here is a tutorial for you (be warned, it is a very photo heavy post)!

Punch or trim each each end (I used the Scalloped Tag Topper Punch).
Take another piece of cardstock measuring 7 cm x 6 cm.
Score at 5mm and 1cm on all four sides.

Remove each corner piece.

Turn the cardstock over and using a ruler and pencil, draw lines from corner to corner.

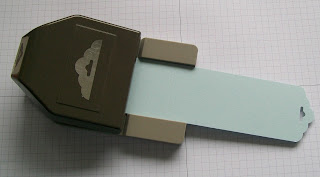
Insert card into the 1 3/4" x 7/8" punch, line up with the cross and punch out the oval.

Using a bone folder, crease along all the score lines.

To decorate the front I used Versamark ink and heat embossed the images with White Stampin' Emboss powder. (I also used an Embossing Buddy before stamping to eliminate any stray specks of embossing powder).

You will see in the photos at the end of this post that I used a variety of stamps, I am sure you will have plenty that you can use!
Colour in your images (I used Stampin' Write Markers in Daffodil Delight and Calypso Coral).

I used Tombow for the next step - I did try using tape but found that wet glue was much more forgiving!
Apply a thin line of glue along the edges of your treat holder.

Carefully position between the score lines in the middle of the treat holder, tucking all the edges in tightly.

Add the chocolate bunny! If you would prefer to put a chocolate egg into your treat holder, use a circle punch instead of an oval - the 3/4" one works really well.


Thank you so much for looking at my Blog today, I hope you get to make some little treat boxes for Easter. I hope the instructions make sense - if not please message me! I would love to see photos of what you make too.
If you don't have a Stampin' Up! Demonstrator I would love to be yours! If you don't have a catalogue and you would like one, please let me know and I will send one to you.
If you would like specific details of the products I used today please message me (you can basically use any bits and pieces that you already have to make these). If you do need to order any supplies, simply use my “shop with me” button or click on the catalogue links on the right. Alternatively, contact me and I would be happy to place your order for you.
All orders over £20 (excluding postage) will receive a little thank you from me if you use the current Hostess Code: JY2VTRCD (please remember to allow me to access your contact details otherwise I won't be able to contact you).
For orders over £150 please do not use the Hostess Code to ensure that you receive the benefits.
Wishing you all a very happy Easter!
Susan xx

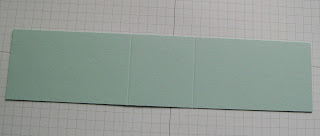
Take a piece of card measuring 21.5 cm x 5 cm (I used Pool Party).
Score at 8.5cm from each end.

Punch or trim each each end (I used the Scalloped Tag Topper Punch).

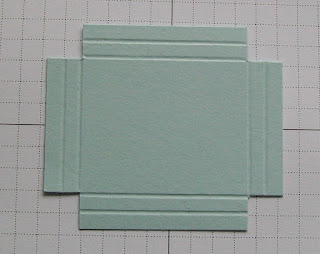
Take another piece of cardstock measuring 7 cm x 6 cm.
Score at 5mm and 1cm on all four sides.

Remove each corner piece.


Turn the cardstock over and using a ruler and pencil, draw lines from corner to corner.

Insert card into the 1 3/4" x 7/8" punch, line up with the cross and punch out the oval.

Using a bone folder, crease along all the score lines.

To decorate the front I used Versamark ink and heat embossed the images with White Stampin' Emboss powder. (I also used an Embossing Buddy before stamping to eliminate any stray specks of embossing powder).

You will see in the photos at the end of this post that I used a variety of stamps, I am sure you will have plenty that you can use!
Colour in your images (I used Stampin' Write Markers in Daffodil Delight and Calypso Coral).

I used Tombow for the next step - I did try using tape but found that wet glue was much more forgiving!
Apply a thin line of glue along the edges of your treat holder.

Carefully position between the score lines in the middle of the treat holder, tucking all the edges in tightly.

Add the chocolate bunny! If you would prefer to put a chocolate egg into your treat holder, use a circle punch instead of an oval - the 3/4" one works really well.

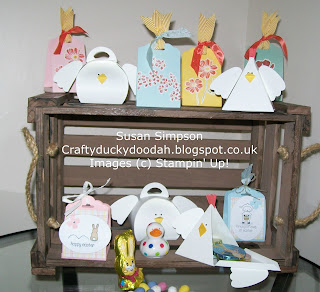
Fold over the side pieces and fasten together with the ribbons/threads of your choice. I used the lovely Crushed Curry Chevron Ribbon and some Pool Party Seam Binding Ribbon.

I ended up making a whole load of different treats to give to friends and neighbours over the Easter holidays.

If you don't have a Stampin' Up! Demonstrator I would love to be yours! If you don't have a catalogue and you would like one, please let me know and I will send one to you.
If you would like specific details of the products I used today please message me (you can basically use any bits and pieces that you already have to make these). If you do need to order any supplies, simply use my “shop with me” button or click on the catalogue links on the right. Alternatively, contact me and I would be happy to place your order for you.
All orders over £20 (excluding postage) will receive a little thank you from me if you use the current Hostess Code: JY2VTRCD (please remember to allow me to access your contact details otherwise I won't be able to contact you).
For orders over £150 please do not use the Hostess Code to ensure that you receive the benefits.
Wishing you all a very happy Easter!
Susan xx


Comments
Post a Comment