Sweet Strawberry - Ink Stamp Share
Hello and welcome to another Ink Stamp Share blog hop. Grab a cuppa and hop around with us; we have 26 hoppers and lots of fabulous projects to share with you.
This month we are sharing inspiration using items from the Spring / Summer and Sale-A-Bration brochures. I will be using a new stamp and punch bundle called Sweet Strawberry for my project.
If you have hopped over from the fabulous Dana Sullivan or you are starting here with me at Craftyducky HQ, welcome - we have some fabulous projects to share with you this month!
Isn't this the sweetest bundle in the January to June mini catalogue? It's full of juicy, plump strawberries and all occasion sentiments that can be used all year round. It makes me think of lazy Sunday Summer picnics by the river - ooh my mouth is watering already!
Sometimes less is more and, as I was short of time a quick and simple project was called for.
Here is my project:
The colours I used:
You will need:
14.5 cm x 16 cm Basic White Thick (BWT) - scored at 8 cm
7.5 cm x 14 cm BWT
Small piece of BWT for stamping/punching
The Strawberries:
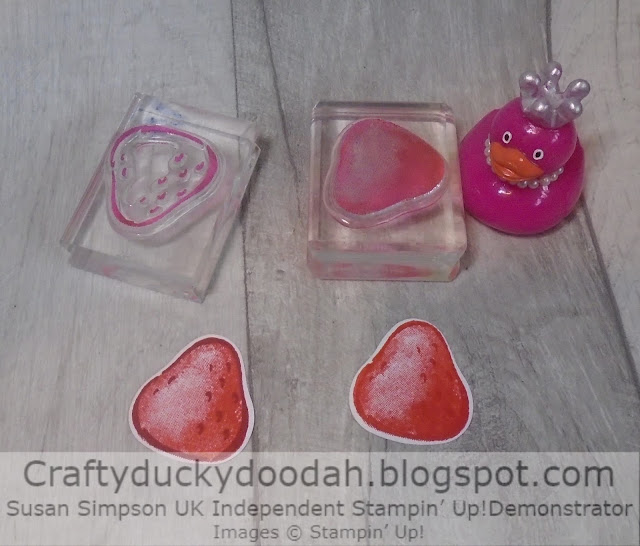
I have not had a chance to play with Sweet Strawberry before today so I decided to have a bit of an experiment with the strawberries.
I stamped and punched out two strawberries. One using just Poppy Parade for the outline and the infill (right), and the other, with a Cherry Cobbler outline and Poppy Parade infill.
Then I had a lightbulb moment! I decided to heat emboss the strawberries with clear embossing powder.
Dab each strawberry with an embossing buddy to make sure the ink is dry and then stamp the infill onto the berry with Versamark ink. Heat emboss with clear embossing powder.
WOW is all I can say - they look so juicy and shiny!! Very difficult to photograph but they look even better in real life.
Once embossed, I preferred the strawberry with the Cherry Cobbler outline and this is the one I used for my project.
You will also need to stamp and punch out the stalk for the strawberry using Granny Apple Green ink for both the outline and the infill.
This stamp set is a 'distinktive' stamp set - the dimension and texture on the stamped images is stunning and looks very realistic.
Top Tip #1
Clean the infill stamp before inking up with Versamark ink otherwise you will have a very dirty inkpad!
Top Tip #2
If you are planning to heat emboss a strawberry don't punch it out first! I used a pair of tweezers to hold the strawberry but it got a bit hot!
To assemble:
Stamp the sentiment with Memento ink on the BWT panel and adhere the strawberry in the bottom corner with dimensionals.
Adhere the stem using tiny dabs of Tombow on the two bottom leaves only. I then used a black gel pen to draw a wavy frame around the panel. Adhere with dimensionals to the card front.
The inside/envelope:
I used some of the Berry Delightful DSP to decorate the inside of the card and the envelope flap.
Thank you for hopping along with us - I hope you are enjoying our projects; don't forget to leave comments as you hop around (we like that)! Next up is Laura Mackie, I can't wait to see which products she has chosen to use.
Details of the products I used for this project can be found below along with a list of hop participants just in case you get lost along the way!
Roll Call
Thank you so much for looking at my Blog today, if you don't have a Stampin' Up! Demonstrator and you live in the UK, I would love to be yours!
If you would like a copy of either of the current Annual Catalogue or the current Mini Catalogue let me know and I will pop one in the post for you. If you prefer, you can view an online version by clicking the link to the right of this post. Also, the January - June Mini Catalogue and the Sale-A-Bration Brochure are available now - if you would like a copies, let me know!
Thank you for shopping with me and supporting my business.


Super cute!!! I love it! :-) I'm off to make some juicy strawberries now! ;-)
ReplyDeleteSimply adorable!
ReplyDeleteLovely card x
ReplyDeleteNow I'm going to have to eat some strawberries, love the embossing on it. Great idea, thanks for sharing.
ReplyDeleteLove this!
ReplyDeleteGreat idea to use the embossed layer on top of the strawberry! Love the doodled line too!
ReplyDeleteBeautiful card
ReplyDeleteCute card Susan, love the shiny strawberry x
ReplyDeleteLovely card and love the strawberry x
ReplyDeleteI love the simplicity of this design and what you have done with the strawberry.xx
ReplyDeleteFabulous card xx
ReplyDelete'Sweet' card,
ReplyDeleteThanks for hopping with us this month xx
Great card and great "juicy" strawberry!
ReplyDeleteGreat ideas for 'juicing' up your strawberries - thank you for sharing it with us
ReplyDeleteGorgeous simple but beautiful card, love the doodles too, thanks for sharing x
ReplyDelete