
How to create a 'smoosh' watercolour background - SBTD 03/2018
Hello, welcome to another Stampers by the Dozen Blog Hop. This month our theme is background techniques, chosen by Tashana. The technique I am sharing is an old favourite of mine; the 'smoosh' watercolour background technique.

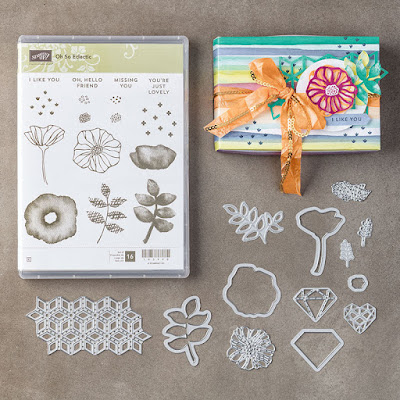
I decided to revisit a favourite bundle from the Annual Catalogue for my project this month - Oh So Eclectic.


You can have lots of fun with this technique and there are lots of ways to take things a bit further, here are few of them.

I have no idea if there is a thing called the 'smoosh' watercolour background technique - if you know the proper name or an alternative, please let me know!
Details of the products I used for this project can be found below. I will post further details of the finished card next week.
Next on the hop is Tricia who I'm sure has something fabulous to share with you too. Don't forget to leave a comment below (we like that).
 Happy 'smooshing'!
Thank you so much for looking at my Blog today, if you don't have a Stampin' Up! Demonstrator I would love to be yours! If you don't have a copy of any of the current catalogues and you would like one, please let me know and I will send one to you straight away.
If you need to order any supplies, simply use my “shop with me” button or click on the catalogue links on the right. Alternatively, contact me and I would be happy to place an order for you.
Would you like to receive a FREE gift from me? All orders placed directly with me or online receive a handmade card from me as a thank you but did you know that all orders over £20 (excluding postage) will receive a gift from me too? If you use the current Hostess Code: YSGDYDPQ I will pop something in with your order or post directly to you, (please remember to allow me to access your contact details otherwise I won't be able to contact you).
For orders over £150 please do not use the Hostess Code to ensure that you receive the benefits - you will still receive a gift from me too!
Please click on the images below to go straight to my online store if you are in the UK.
I decided to revisit a favourite bundle from the Annual Catalogue for my project this month - Oh So Eclectic.

For this project it was really easy to decide which colours to use. Whilst tidying up after Coffee & Cards this week I spotted three ink pads stacked up on my desk ...
I always have a silicone craft sheet on my desk underneath my Stampin' Up! grid paper which is just as well as this technique can be quite messy - you will also need to kitchen towel to hand too.

You will also need the following items:
- Ink in your chosen colours
- Clear Block 'C'
- Stampin' Spritzer
- Shimmery White Cardstock
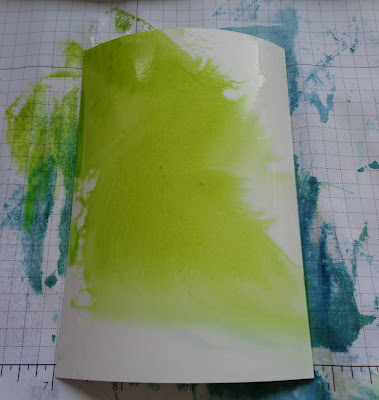
Step 1
Using the Spritzer, spray cardstock with water to dampen. (8 - 10 sprays depending on card size).
Step 2
Take the 'C' Block and press into your first ink pad. 'Smoosh' across the wet cardstock. Wipe the block clean on the kitchen towel.

Step 3
Press the block onto the next colour and again, 'smoosh' across the damp cardstock allowing the colours to mingle. Clean the block.

Step 3
Using the final colour, repeat!

Step 4
Using a Heat Tool, carefully dry the cardstock. Once dry place under a book or something with a bit of weight to flatten further.
Top Tip
Heat the cardstock from underneath too as this will help to flatten it out.
Once dry you will be able to see the shimmer on the card too - hopefully you can see it on the photo below ...

I had great fun creating several backgrounds with this technique. Be warned, you will get quite inky fingers!

You can have lots of fun with this technique and there are lots of ways to take things a bit further, here are few of them.
- Spritz more water onto the panel and allow the colours to run around and mingle further.
- When you have inked up the panel, take a piece of kitchen towel and blot. This will lighten the intensity of the inks and it was also dry quicker too!
- Sprinkle rock salt onto the wet panel - and allow to dry. This creates really interesting effects as the salt crystals absorb some of the ink and water.
- Smoosh across the panel to create stripes - this useful for scenic backgrounds!
I hope you will give this technique a try - it is great fun and, you never get the same result twice!
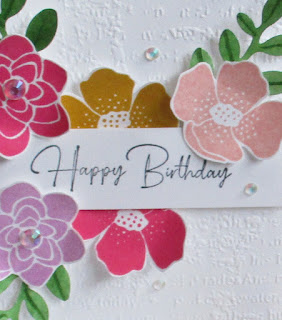
Once I had created my panels I made one into a card using the Oh So Eclectic bundle - love a bundle, especially the 10% discount!!

I have no idea if there is a thing called the 'smoosh' watercolour background technique - if you know the proper name or an alternative, please let me know!
Next on the hop is Tricia who I'm sure has something fabulous to share with you too. Don't forget to leave a comment below (we like that).
Susan xx
Susan Simpson you are here!
Thank you so much for looking at my Blog today, if you don't have a Stampin' Up! Demonstrator I would love to be yours! If you don't have a copy of any of the current catalogues and you would like one, please let me know and I will send one to you straight away.
If you need to order any supplies, simply use my “shop with me” button or click on the catalogue links on the right. Alternatively, contact me and I would be happy to place an order for you.
Would you like to receive a FREE gift from me? All orders placed directly with me or online receive a handmade card from me as a thank you but did you know that all orders over £20 (excluding postage) will receive a gift from me too? If you use the current Hostess Code: YSGDYDPQ I will pop something in with your order or post directly to you, (please remember to allow me to access your contact details otherwise I won't be able to contact you).
Please click on the images below to go straight to my online store if you are in the UK.


Susan, I love the different looks you can achieve with this technique. Love your card!
ReplyDeletethank you Judi - these backgrounds are very quick to create as long as you don't mind inky fingers!
DeleteNo two cards would be the same. Great technique
ReplyDeleteThanks Carly - as you say no two are alike!
DeleteSo Beautiful! I agree, this technique is always different. Thanks for sharing the details!
ReplyDeleteThank you Karie.
DeleteI always love seeing how this technique ends up. So pretty!
ReplyDeleteThanks - love a crafty surprise!
DeleteI think I need to give this a try - looks like fun with a great result.
ReplyDeleteYou should definitely give this technique a try Courtenay - I warn you though it is addictive!
Delete