
Stampin' Up! Eater Treat - tutorial
Hello, as promised yesterday here are the instruction you need to make one of the little treat boxes. These little boxes are the perfect size for a little treat or thank you gift.

Using Pumkin Pie card stock and the Lots to Love Box Framelits Dies, cut one box shape. I used one of the gift card holder cut out dies across the top right corner at the same time.
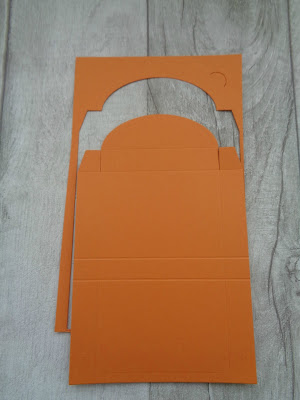
Using a 3/4" circle punch, punch out the notched shape - this clever little piece will be the closure for your box.

Using either the Stampin' Trimmer or the Simply Scored tool, score the cut box piece at 2 1/8" and 2 3/4" from the flat edge.
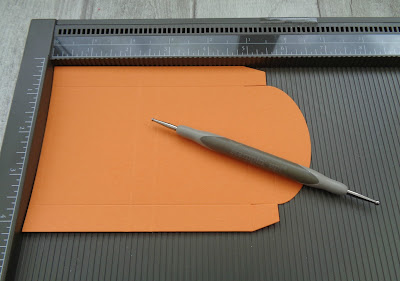
Using a pair of Snips, trim off the tabs at the top and notch out both sides of the squares in the middle.

Burnish all score lines with a Bone Folder and assemble the box using Tombow Liquid Glue.
Decorate the front and the flap with your choice of DSP. You could also stamp the box or leave it plain if you prefer. I used one of the Layering Ovals Framelits for the flap which was cut in half.
I stamped and die cut a rabbit and carrot for each box and coloured them with the Stampin' Blends. I used Basket Bunch, a stamp set which is now sadly retired but I know that many of you have this from last year.

I placed a Mini Stampin' Dimensional behind the punched out circle and adhered in place.
Top Tip
Remove the backing from the Dimensional and position the tab onto the flap and then press down to adhere. This helps (a lot) to esnure the flap closes in the correct position!

The most difficult part of this project was inserting the carrots into the treat bags.
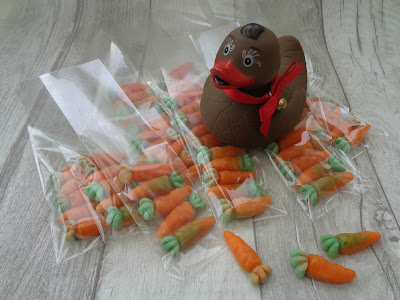
Here are some of the completed treats. Everyone who crafts with me this week will receive one of these treats including the lovely ladies at the Care Home I visit each week.

I hope these instructions make sense - if not, give me a shout! Note to self: I really must think about getting to grips with video tutorials ...
Thanks for looking at my Blog today, details of the products I used for this project can be found below.
I hope you will give these little treat boxes a go, happy crafting!
Susan xx
If you don't have a Stampin' Up! Demonstrator I would love to be yours! If you don't have a copy of any of the current catalogues and you would like one, please let me know and I will send one to you straight away.
If you need to order any supplies, simply use my “shop with me” button or click on the catalogue links on the right. Alternatively, contact me and I would be happy to place an order for you.
Would you like to receive a FREE gift from me? All orders placed directly with me or online receive a handmade card from me as a thank you but did you know that all orders over £20 (excluding postage) will receive a gift from me too? If you use the current Hostess Code: YSGDYDPQ I will pop something in with your order or post directly to you, (please remember to allow me to access your contact details otherwise I won't be able to contact you).
For orders over £150 please do not use the Hostess Code to ensure that you receive the benefits - you will still receive a gift from me too!
Please click on the images below to go straight to my online store if you are in the UK for more details or to place an order.


Using Pumkin Pie card stock and the Lots to Love Box Framelits Dies, cut one box shape. I used one of the gift card holder cut out dies across the top right corner at the same time.

Using a 3/4" circle punch, punch out the notched shape - this clever little piece will be the closure for your box.

Using either the Stampin' Trimmer or the Simply Scored tool, score the cut box piece at 2 1/8" and 2 3/4" from the flat edge.

Using a pair of Snips, trim off the tabs at the top and notch out both sides of the squares in the middle.

Burnish all score lines with a Bone Folder and assemble the box using Tombow Liquid Glue.
Decorate the front and the flap with your choice of DSP. You could also stamp the box or leave it plain if you prefer. I used one of the Layering Ovals Framelits for the flap which was cut in half.
I stamped and die cut a rabbit and carrot for each box and coloured them with the Stampin' Blends. I used Basket Bunch, a stamp set which is now sadly retired but I know that many of you have this from last year.

I placed a Mini Stampin' Dimensional behind the punched out circle and adhered in place.
Top Tip
Remove the backing from the Dimensional and position the tab onto the flap and then press down to adhere. This helps (a lot) to esnure the flap closes in the correct position!

The most difficult part of this project was inserting the carrots into the treat bags.

Here are some of the completed treats. Everyone who crafts with me this week will receive one of these treats including the lovely ladies at the Care Home I visit each week.

I hope these instructions make sense - if not, give me a shout! Note to self: I really must think about getting to grips with video tutorials ...
Thanks for looking at my Blog today, details of the products I used for this project can be found below.
I hope you will give these little treat boxes a go, happy crafting!
Susan xx
If you don't have a Stampin' Up! Demonstrator I would love to be yours! If you don't have a copy of any of the current catalogues and you would like one, please let me know and I will send one to you straight away.
If you need to order any supplies, simply use my “shop with me” button or click on the catalogue links on the right. Alternatively, contact me and I would be happy to place an order for you.
Would you like to receive a FREE gift from me? All orders placed directly with me or online receive a handmade card from me as a thank you but did you know that all orders over £20 (excluding postage) will receive a gift from me too? If you use the current Hostess Code: YSGDYDPQ I will pop something in with your order or post directly to you, (please remember to allow me to access your contact details otherwise I won't be able to contact you).
Please click on the images below to go straight to my online store if you are in the UK for more details or to place an order.


These are lovely. Did you make the carrots too!!! k x
ReplyDeleteThanks Karen - I think the carrots must count as one of our five a day don't you? xx
Delete