
Celebrate Sunflowers - stepped up
Hello, I'm back again sharing details of another project this time using the Sunflower Dies.


I absolutely love this project which surprised me as I am not a fan of pink things generally! The bold and bright colours on this card are perfect for the lovely sunshine we are enjoying in the UK at the moment too.
My project:

The colours I used:
You will need:
21 cm x 14.5 cm - scored at 10.5 cm
11 cm x 8 cm ww thick - frame
piece of ww thick - for flowers x 2
Scraps of Magenta Madness - for flower centres x 3
6.5 cm x 9 cm Designer Series Paper (DSP)
10 cm x 14 cm Magenta Madness
9.5 cm 13.5 cm ww regular
The background:
I used a new embossing folder called Tasteful Textures. Hopefully you can see how beautiful it looks on the photo. Trust me, it looks fabulous up close!

This 3D embossing folder creates a look of luxurious fabric and will add texture to masculine and feminine projects alike.
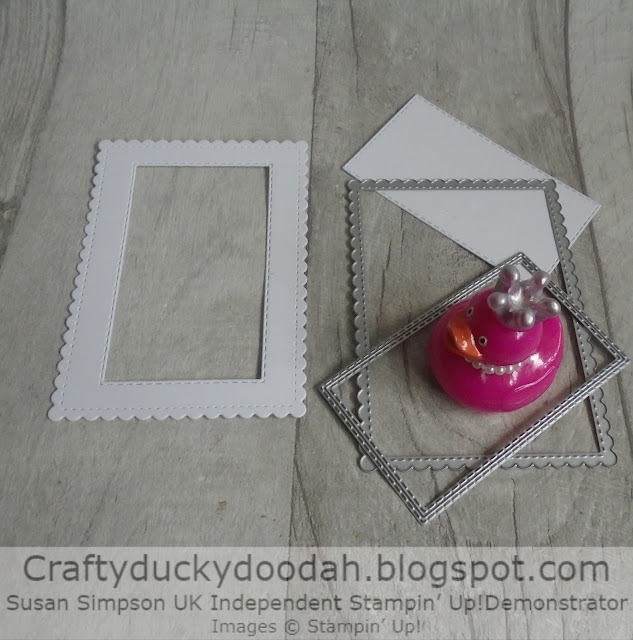
The die cutting:
There is only one thing better than a stitched edge in my opinion and that is two stitched edges!

I used two dies, one from Stitched So Sweetly and the other a Stitched Rectangle die to create a frame.
I used the largest sunflower to cut out two flowers from thick ww and cut three flower centres from a piece of Magenta Madness card.
To assemble:
Adhere the die cut sunflower on the reverse of the die cut frame. I used double sided tape - it doesn't really matter what you use as it won't be seen!

Trim edges carefully from the reverse.

I used Foam Adhesive Strips on the reverse of all four sides of the frame. Peel the backing off and adhere the piece of DSP.
I used dimensionals to adhere the embossed panel and then used Tombow on the back of the DSP to adhere the assembled die cut frame.
I stacked two dimensionals to adhere the flower centre.
The details:
I tied a small bow and adhered in the corner with a mini glue dot as a finishing touch.

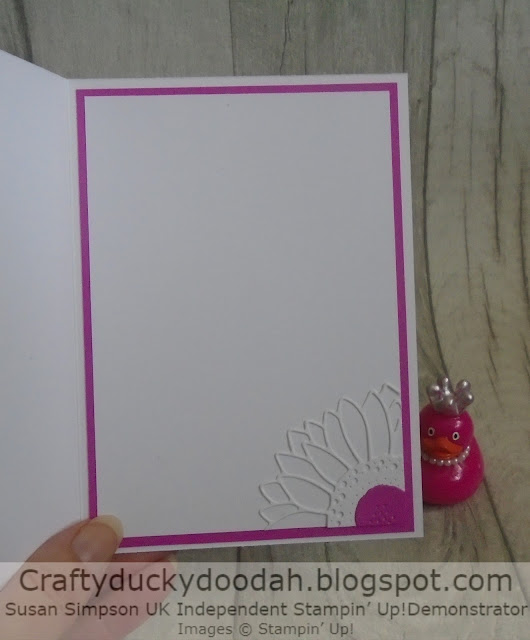
The inside:
Using tiny dabs of Tombow, partially adhere the die cut flower in the corner of the regular ww panel. Trim carefully once the adhesive is dry. Save the leftover piece to use on the envelope or, alternatively cut another one! Adhere the centre of the flower with Tombow and carefully trim.

I used double sided tape to adhere the Magenta Madness panel and the decorated ww panel to the inside of the card.
I used the remaining piece of the die cut flower and the last flower centre on a corner of the envelope.
Alternative background:
I did consider a Magenta Madness embossed background but it was a little too pink for me!

The card and envelope:
I love the texture on the embossed background of this card - I will be using this new embossing folder a lot I think! I left my card sentiment free, I thought about adding one on the inside but then decided I would use this card as a notecard.

I'm going to have a look at all the dies I have - I'm sure lots of other ones would look great using this technique too.
I'm back again at the weekend with another Hop Around The World. I have a special project to share that features one of my favourite things; coffee!!
Have a crafty weekend, stay safe and well.
Susan xx
If you have any questions, or need help with anything I’m always happy to help. You can email me susan_merrey@yahoo.co.uk or telephone 07905 403 823 during normal working hours.
Thank you so much for looking at my Blog today, if you don't have a Stampin' Up! Demonstrator and you live in the UK, I would love to be yours!
If you need to order any supplies, simply use my “shop with me” button or click on the catalogue links on the right. Alternatively, contact me and I would be happy to place an order for you.
If you would like copies of either of the current catalogues let me know and I will pop them in the post for you. If you prefer, you can view online versions by clicking the links to the right of this post. The new Annual Catalogue is now available! If you would like me to send you a copy please let me know.

Would you like to receive a FREE gift from me?All orders placed directly with me or online receive a handmade card from me as a thank you but did you know that all orders over £20 (excluding postage) will receive a gift from me too? If you use the current Hostess Code I will pop something in with your order or post directly to you. (Please remember to allow me to access your contact details otherwise I won't be able to contact you).

If your order is over £150 please don't use the code as you will receive your own Stampin' Rewards. You will still receive a card and a gift from me.
If you are local to me and can collect, I’m happy for you to piggyback one of my orders to save on postage.
Thank you for shopping with me and supporting my business.
Thank you so much for looking at my Blog today, if you don't have a Stampin' Up! Demonstrator and you live in the UK, I would love to be yours!
If you need to order any supplies, simply use my “shop with me” button or click on the catalogue links on the right. Alternatively, contact me and I would be happy to place an order for you.
If you would like copies of either of the current catalogues let me know and I will pop them in the post for you. If you prefer, you can view online versions by clicking the links to the right of this post. The new Annual Catalogue is now available! If you would like me to send you a copy please let me know.

Would you like to receive a FREE gift from me?

If you are local to me and can collect, I’m happy for you to piggyback one of my orders to save on postage.
Thank you for shopping with me and supporting my business.


Comments
Post a Comment