
Stampin' Up! Stampers By The Dozen 11/18
Hello and welcome to another Stampers By The Dozen Blog Hop. This month our challenge was to create a Christmas home decor or 3d item and was chosen by Laura.

If you are starting here with me, or hopping on from Judi and her lovely project, welcome - I hope you find lots of inspiration as you hop along with us.
As soon as I saw the Sprig punch on page 29 of the Autumn / Winter Catalogue an idea popped into my mind.

Under the image of the punch in the catalogue the description tell you that 'you can use a single punched piece as an accent, or punch multiple sprigs to create a wreath'. So I did!
There are many versions of wreaths made with the Sprig Punch on Pinterest and several useful tutorials on YouTube too - just search and see for yourself.
**Edited - 23.11.18**
A lovely Stampin' Up! Demonstrator called Patricia Todd from North Carolina (USA) shared a free tutorial a couple of months ago on a Demo only Facebook Group. It took me a couple of weeks to find the post again - us Demonstrators post a lot and there are over 27,000 in this particular group! Patricia's wreath looks a bit different to the one I made and she assembled hers in a different way. One of the things I love most about Stampin' Up! is the Create, Share and Inspire ethos behind the brand and the way that everyone encourages and supports each other. If you would like to see Patricia's project you can see it here.
The colours I chose for my wreath are a favourite combo of mine.
I used a sheet of hardboard - you know the pieces you get in the DSP packs? One of those - they are really useful so I always keep them. I drew around a dish and then for the inner circle I drew around a roll of tape.
I used a single A4 sheet of each colour - if you punch along the long edge you can get 10 punched sprigs (sometimes 11 if you are careful). In total at least 40 sprigs from each sheet which is just about the number you need.

Top Tip
I used Tombow to adhere all the springs to my wreath. I squeezed a puddle of glue onto an old saucer and just dabbed the end of the sprig in the glue and stuck to the wreath. Much quicker and less messy this way!
Carefully lay each piece around the wreath - three in each row is just right. I tried not to think about the colours I was using - I went for a random look!

Once you have filled the wreath you can add the lights. I adhered the end on the back with some washi tape. Turning the lights on at this point gives you a better idea of how your wreath will look.
Top Tip
I used one of my favourite RIBA frames from IKEA. The back panel of the frame has one corner removed which is just perfect for adding lights.
Make sure your wire comes out in the right corner!
Now you can have some fun choosing which punched/die cut shapes you want to decorate the wreath with.
I punched some sprigs using the Joyous Noel Glimmer Paper in Copper and Merry Merlot. I then cut some leaves and branches using the Seasonal Layers Thinlits but you could use any others that you may have.

I tied a bow with the gorgeous Merry Merlot/Copper reversible ribbon as a finishing touch.
I chose a piece of Wood Textures DSP as the 6" x 6" piece was just the right size for the aperture on the frame. There are lots to choose from in this paper stack you will will be able to choose something to coordinate with most colour schemes.
No matter how carefully you wrap the lights around the wreath it is inevitable that you will have some lights on the back. Several of my crafty ladies tried really hard not to do this!

Top Tip
I have one final tip for you ... I used Stampin' Dimensionals to adhere my wreath to the mount. So as not to waste the lights on the back of the wreath I 'double padded'. Doing this lifts the wreath from the mount so that the lights shine through from the back.

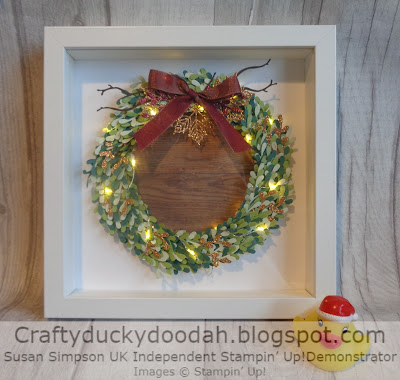
Here is my finished wreath, framed and lit up - I love it!!
To date I have run three workshops to make this project (I have another planned for next week) - each wreath was different and, they all looked amazing; especially when the lights are on!
Here are a few of them ...

I hope you enjoyed my project - I would love you to leave a comment below to let me know what you think of it.
If you like the look of this project why not give it a go? You won't regret it! I can see this project made in soft pinks and greens for the Spring or, perhaps you could add a family photo to the centre of the wreath. It would make such a lovley gift - if you can bear to part with it that is! You can find details of the items I used at the end of this post.
Thanks to Patricia for sharing the free tutorial - it made me take time to craft something for myself for a change and allowed me to relax and get super sticky with the Tombow!
Next up is Tricia - I can't wait to see her project! If you get lost along the way, a list of participants in the hop can be found below.

Happy crafting.
Susan xx
Blog Hop Participants
Thank you so much for looking at my Blog today, if you don't have a Stampin' Up! Demonstrator and you live in the UK, I would love to be yours!
If you don't have a copy of the 2018 - 2019 Annual Catalogue or the Autumn / Winter Catalogue and you would like one, please let me know and I will send them to you straight away.
If you need to order any supplies, simply use my “shop with me” button or click on the catalogue links on the right. Alternatively, contact me and I would be happy to place an order for you.

If you are in the UK, please click on the images below to go straight to my online store or for further information.

If you are starting here with me, or hopping on from Judi and her lovely project, welcome - I hope you find lots of inspiration as you hop along with us.
As soon as I saw the Sprig punch on page 29 of the Autumn / Winter Catalogue an idea popped into my mind.

Under the image of the punch in the catalogue the description tell you that 'you can use a single punched piece as an accent, or punch multiple sprigs to create a wreath'. So I did!
There are many versions of wreaths made with the Sprig Punch on Pinterest and several useful tutorials on YouTube too - just search and see for yourself.
**Edited - 23.11.18**
A lovely Stampin' Up! Demonstrator called Patricia Todd from North Carolina (USA) shared a free tutorial a couple of months ago on a Demo only Facebook Group. It took me a couple of weeks to find the post again - us Demonstrators post a lot and there are over 27,000 in this particular group! Patricia's wreath looks a bit different to the one I made and she assembled hers in a different way. One of the things I love most about Stampin' Up! is the Create, Share and Inspire ethos behind the brand and the way that everyone encourages and supports each other. If you would like to see Patricia's project you can see it here.
The colours I chose for my wreath are a favourite combo of mine.
I used a sheet of hardboard - you know the pieces you get in the DSP packs? One of those - they are really useful so I always keep them. I drew around a dish and then for the inner circle I drew around a roll of tape.
I used a single A4 sheet of each colour - if you punch along the long edge you can get 10 punched sprigs (sometimes 11 if you are careful). In total at least 40 sprigs from each sheet which is just about the number you need.

Top Tip
I used Tombow to adhere all the springs to my wreath. I squeezed a puddle of glue onto an old saucer and just dabbed the end of the sprig in the glue and stuck to the wreath. Much quicker and less messy this way!
Carefully lay each piece around the wreath - three in each row is just right. I tried not to think about the colours I was using - I went for a random look!

Once you have filled the wreath you can add the lights. I adhered the end on the back with some washi tape. Turning the lights on at this point gives you a better idea of how your wreath will look.
Top Tip
I used one of my favourite RIBA frames from IKEA. The back panel of the frame has one corner removed which is just perfect for adding lights.
Make sure your wire comes out in the right corner!
Now you can have some fun choosing which punched/die cut shapes you want to decorate the wreath with.
I punched some sprigs using the Joyous Noel Glimmer Paper in Copper and Merry Merlot. I then cut some leaves and branches using the Seasonal Layers Thinlits but you could use any others that you may have.

I tied a bow with the gorgeous Merry Merlot/Copper reversible ribbon as a finishing touch.
I chose a piece of Wood Textures DSP as the 6" x 6" piece was just the right size for the aperture on the frame. There are lots to choose from in this paper stack you will will be able to choose something to coordinate with most colour schemes.
No matter how carefully you wrap the lights around the wreath it is inevitable that you will have some lights on the back. Several of my crafty ladies tried really hard not to do this!

Top Tip
I have one final tip for you ... I used Stampin' Dimensionals to adhere my wreath to the mount. So as not to waste the lights on the back of the wreath I 'double padded'. Doing this lifts the wreath from the mount so that the lights shine through from the back.

Here is my finished wreath, framed and lit up - I love it!!

To date I have run three workshops to make this project (I have another planned for next week) - each wreath was different and, they all looked amazing; especially when the lights are on!
Here are a few of them ...

I hope you enjoyed my project - I would love you to leave a comment below to let me know what you think of it.
If you like the look of this project why not give it a go? You won't regret it! I can see this project made in soft pinks and greens for the Spring or, perhaps you could add a family photo to the centre of the wreath. It would make such a lovley gift - if you can bear to part with it that is! You can find details of the items I used at the end of this post.
Thanks to Patricia for sharing the free tutorial - it made me take time to craft something for myself for a change and allowed me to relax and get super sticky with the Tombow!
Next up is Tricia - I can't wait to see her project! If you get lost along the way, a list of participants in the hop can be found below.
Happy crafting.
Susan xx
Blog Hop Participants
Susan Simpson You are here!
Thank you so much for looking at my Blog today, if you don't have a Stampin' Up! Demonstrator and you live in the UK, I would love to be yours!
If you don't have a copy of the 2018 - 2019 Annual Catalogue or the Autumn / Winter Catalogue and you would like one, please let me know and I will send them to you straight away.
If you need to order any supplies, simply use my “shop with me” button or click on the catalogue links on the right. Alternatively, contact me and I would be happy to place an order for you.
Would you like to receive a FREE gift from me? All orders placed directly with me or online receive a handmade card from me as a thank you but did you know that all orders over £20 (excluding postage) will receive a gift from me too? If you use the current Hostess Code I will pop something in with your order or post directly to you. (Please remember to allow me to access your contact details otherwise I won't be able to contact you).

If your order is over £150 please don't use the code as you will receive your own Stampin' Rewards. You will still receive a card and a gift from me.
If you are in the UK, please click on the images below to go straight to my online store or for further information.


WOW, WOW, WOW :-) Love your wreath! so creative :-)
ReplyDeleteThank you Sharleen :)
DeleteOh my gosh, I LOVE this project!! It's now on my list of things to make before Christmas! :) :) :)
ReplyDeleteYou should make one Dena - you should be able to finish in around 2 hours. They are addcitive! There are lots of different version of this wreath on Pinterest too.
DeleteYour wreath is simply amazing. Love the way you added the lights. :)
ReplyDeleteThanks Tricia - did not want to waste any that were on the back!
DeleteStunning, so many sprigs!
ReplyDeleteAround 160 of them Carly!
DeleteOMG that is amazing. I love the sprig punch!
ReplyDeleteMe too Deb - so pleased it will be staying with us!
DeleteLove this wreath!
ReplyDeleteThanks Judi.
DeleteGreat tips Susan. I just might have to make another one. k x
ReplyDeleteThanks Karen xx
ReplyDelete