Garden Wishes - Stampers Showcase
Hello and welcome to another Stampers Showcase Blog Hop. This month our theme is Springtime, I will be using a stamp set called Garden Wishes for my project.
If you are starting here with me or have hopped over from Mo at Crafty Rootes, welcome - we have lots of fabulous projects to share so, why not grab a cuppa and hop along with us. Spring is such a wonderful time of the year, I love to see the flowers and trees burst into life don't you? I am lucky to live in such a beautiful corner of the world with many riverside walks and meadows to stroll through. Hopefully lockdown restrictions will ease soon and I can meet up with friends again, go for a stroll and a coffee.
Wherever possible I try to plan ahead with my hop projects. I had a project in mind that used the Garden Wishes stamp set hence the title of my blog.
However I kept changing my mind and all these ideas kept popping into my head. When I finished my project I realised I had not used a single image from the Garden Wishes stamp set. I had however, used the coordinating die set, Dandy Wishes.
This lovely stamp set (and the dies) will still be with us in the upcoming Annual Catalogue so I will have more time to play with them.
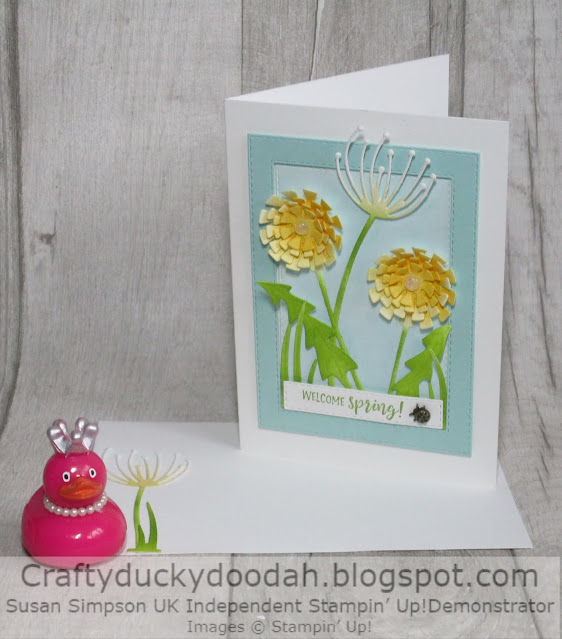
So, here is my project, only the sentiment is stamped!
The colours I used:
You will need:
21 cm x 14.5 cm Basic White Thick (BWT) - scored at 10.5 cm
10 cm x 14 cm BWT
10 cm x 14 cm Pool Party
BWT for die cutting the flowers etc and the sentiment
The background/frame:
I used two Stitched Rectangle dies to create a frame from Pool Party card. I then used the smaller of the two dies to cut a panel from BWT. I used a blending brush to create a sky effect with Balmy Blue ink.
The die cutting:
I cut an assortment of flowers and leaves from BWT card.
The inking:
I used my blending brushes to add colour to the die cut pieces using a pouncing motion. I was not too bothered whether or not the inking was even. I did add a little extra ink on the leaves and the grass for a little shading. You could of course, colour the die cut pieces with many other mediums or, even cut out from coloured card if you prefer.
To flowers:
Carefully bend up each petal and then adhere using a dab of Tombow in the centres. When placing each piece, offset the petals for a fuller look. I added an Opal Round to the centre of each flower for a bit of bling.
I positioned the taller flower stem first placing a mini dimensional just above the stem and then adding tiny dabs of Tombow along the stem. I tucked two pieces of grass along and behind the frame using Tombow and curled the leaves a little.
I then added the two yellow flowers using Tombow. I trimmed the stems and tucked behind the edge of the frame.
The larger leaves were added last of all, again curled and adhered with Tombow but only along the stem and up to the first leaf.
The sentiment:
I used another Stitched Rectangle die, cutting from BWT and stamped the sentiment with Granny Apple Green ink. At this point I was going to add a stamped and die cut tiny bee but at the very last minute I decided I preferred the little lady bug. The sentiment has been adhered centrally just inside the frame with dimensionals. I used a rolled up glue dot to adhere the ladybird.
The inside/envelope:
I used more die cuts to decorate the inside of the card and the envelope. Each piece has been firmly adhered with tiny dabs of Tombow.
The completed project:
I like the effect of having flowers overhang the frame slightly - it adds more dimension.
Next up is Rochelle Laird-Smith who has more Spring inspiration to share with us.
Thanks for hopping along with us.
Happy Spring!
Susan xx
Thank you so much for looking at my Blog today, if you don't have a Stampin' Up! Demonstrator and you live in the UK, I would love to be yours!
If you would like a copy of either of the current Annual Catalogue or the current Mini Catalogue let me know and I will pop one in the post for you. If you prefer, you can view an online version by clicking the link to the right of this post.
If your order is over £150 please don't use the code as you will receive your own Stampin' Rewards. You will still receive a card and a gift from me. If you are local to me and can collet, I'm happy for you to piggyback one of my orders to save on postage.


Cute card Susan, love all the sponging. May I case this?
ReplyDeleteOf course you can Mo! xx
DeleteSo cute! Love those blender brushes!
ReplyDeletethanks Deb, me too - I can't seem to stop using them!
DeleteSo pretty Susan. I love the ombre effect on the flowers!!
ReplyDeleteThanks Melissa.
DeleteLovely. I haven't used this set yet and must give this a try
ReplyDeleteSusan, your card is absolutely beautiful!! Well done!
ReplyDelete