Art Gallery - Stamping INKspirations
Hello and welcome to another Stamping INKspirations Blog Hop. I will be using the fabulous Art Gallery bundle for my project.
If you are starting the hop here with me or have hopped over from the lovely Karen Henderson - welcome we have lots of inspiration to share with you; there are 33 crafters hopping this time!
This month our theme is birthdays - love them or loathe them, we all have them!
I was delighted to discover that the fabulous Art Gallery bundle with still be with us in the upcoming Annual Catalogue.
I have used the bundle quite a bit but I have so many more ideas I would like to try with it. I don't think I have used Art Gallery since January coincidentally, for another Stamping INKspirations blog hop. You can see my earlier project HERE.
Here is my project:
The colours I used:
You will need:
21 cm x 14.5 cm Basic White Thick (BWT) - scored at 10.5 cm
10.5 cm x 2.5 cm Bermuda Bay
10.5 cm x 14.5 cm piece of Golden Garden Designer Acetate
BWT card for stamping and die cutting
The stamping/die cutting:
I stamped three of the floral sprays using Pool Party and Pear Pizzazz ink then cut out with the coordinating dies. I only stamped partial images in Pear Pizzazz - not sure why really; when assembling my project it would have been much easier with full images - hey ho!
I then used the small floral image and Bermuda Bay ink to add detail to the Pool Party images. This clever little stamp adds accent colour to all three of the flowers even though they are different sizes!To assemble the card:
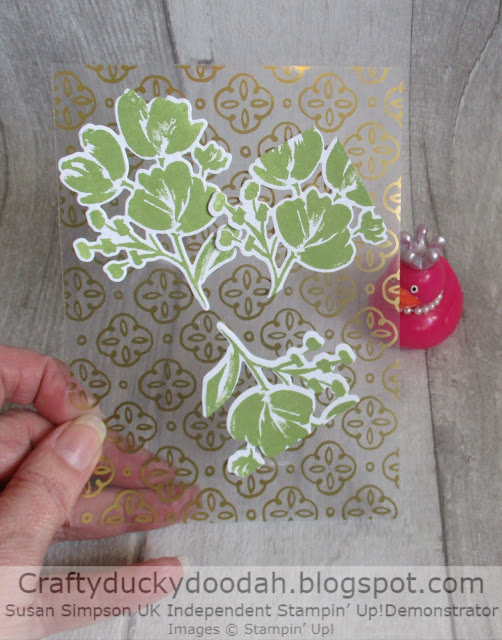
I spent some time deciding how I would arrange the floral sprays on my project. Then I adhered the Pear Pizzazz sprays onto the acetate piece using Tombow.
Acetate can be tricky to adhere as the glue usually shows through and looks messy however, us crafters can usually find a way round this can't we? I used Tombow and applied to the back of the acetate where the floral sprays were. I also used tiny dabs of glue on some of the gold areas and adhered to the card base.
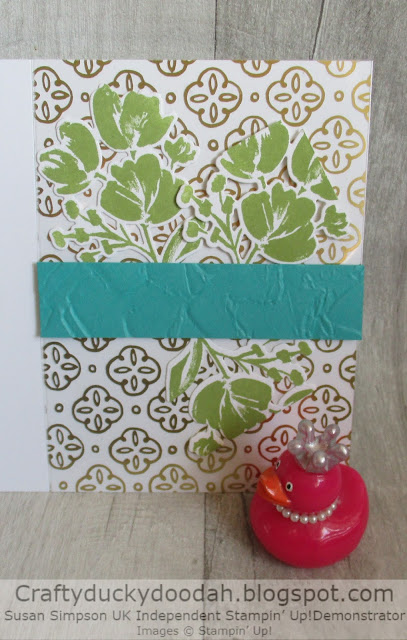
I embossed the piece of Bermuda Bay card with the Painted Texture embossing folder and adhered across the front of my project using dimensionals.
I then trimmed the remaining flowers and adhered on top of the Pear Pizzazz ones. I used Tombow on two of the sprays and dimensionals for the one on the top right of my project.
The sentiment:
I used Bermuda Bay ink for this simple sentiment and cut out with one of the dies from the set. I then adhered across the centre of the card with dimensionals. As a finishing touch I added a couple of gilded gems.
The inside/envelope:
I stamped a partial spray of flowers on the inside of the card and the envelope front using Pool Party and Bermuda Bay ink.
The completed card and envelope:
Here is the completed card and envelope.
Next up is Susan Webster who has another Birthday themed project to share with you.
Thanks for hopping along with us, don't forget to leave comments to let us know what you think of our projects.
If you get lost along the way a list of participants can be found below.
Susan xx
Angie McKenzie ● Leonie Stuart ● Alejandra Gomez
Danielle Kassing ● Annette Ball ● Kirstie Pattrick
Linda Moore ● Mo Rootes ● Libby Fens
Tricia Butts ● Jan Musselman ● Aurélie Fabre
Narelle Fasulo ● Sandra Mastello ● Karen Henderson
Susan Simpson ● Susan Webster ● Melissa Faust
JoAnn Pollock ● Gez Carpenter ● Jo Blackman
Jill Chapman ● Rochelle Laird-Smith ● Melissa Gifford
Terry Hamilton ● Deb Macdowell ● Satomi Wellard
Shel Anderson ● Elaine de Montmorency ● Ann Krucek
Chris Smith ● Cheryl Hamilton ● Teri West
Thank you so much for looking at my Blog today. Unfortunately I am no longer a Stampin' Up! Demonstrator. SU regulations are very strict; I have to wait 3 whole months before I can rejoin again.
If you would like a copy of either of the current Annual Catalogue or the current Mini Catalogue let me know and I will arrange for one to be popped in the post for you. The new Annual Catalogue will also be available soon, let me know if you would like my friend to send you a copy.


Fantastic card, Susan! Your photo tutorial is excellent. Thank you for sharing!
ReplyDeleteThanks Jan, so please you like my tutorials.
DeletePretty card. Great use of the acetate!
ReplyDeleteThank you Libby.
DeletePretty card Susan, love the two tone blooms x
ReplyDeleteThanks Mo, two of my favourite colours! xx
DeleteOh love this colour combo! So pretty!
ReplyDeleteThank you Kirsty.
DeleteFabulous choice of colours Susan! I wouldn't have thought to use the acetate underneath! It really completes it! :)
ReplyDeleteThanks Deb, I am on a mission to use acetate more often!
DeletePretty card....love your color choices!
ReplyDeleteLove this suite of products and it looks great using your alternative colours!
ReplyDeleteThanks Karen, this is one of my favourite combos.
DeleteI love your colors with this set. This is a beautiful card!
ReplyDeleteThank you Teri.
DeletePretty card !
ReplyDeleteThanks Aurelie.
DeleteSimply smashing with the metallic overlay, Susan! Love this bundle and color palette. Thanks for the inspiration and for hopping with us.
ReplyDelete