Above The Clouds - Stepped Up
Hello, here are the details for our final project this week using a stamp and punch bundle called Above The Clouds.
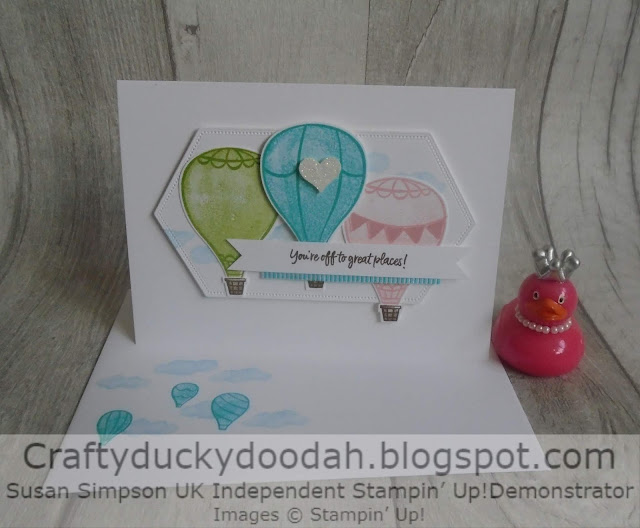
This project started with one of the Stitched Nested Labels dies. As with our first project this week, the panel has been stamped with clouds in Balmy Blue ink using second generation stamping.
You can have lots of fun with these balloons changing the colours, adding some bunting or a sentiment (yes they fit perfectly).
The outline of each balloon has been stamped with full strength ink and the infill with second generation ink (stamped off first).
Having a coordinating punch makes it simple to create lots of balloons in no time at all.
The sentiment has been stamped onto a 1 cm strip of card and the ends 'flagged'. A slightly shorter piece of Bermuda Bay mini striped ribbon has been adhered behind using double sided sticky tape and then adhered across the front of the card using dimensionals.
I used a retired heart punch and some sparkle glimmer paper to accent the middle balloon - so pretty!
Love this sentiment - I have a couple of friends with children who are taking or waiting for exam results before heading off (hopefully) to University later this year so this is just perfect.
I used the trio of smaller balloons (and the infill stamps) to create a little scene on the inside of the card and the envelope.
Here is the completed card and envelope.
You may be thinking that you have seen something similar to this project before; if you turn to page 8 in the Annual Catalogue you will see that this project is my version/interpretation of the card shown there - with a few tweaks of course!
Here is the SU original. The background has been stamped with the image of the three smaller balloons in Blushing Bride ink and then a white kraft ink pad has been dragged across to create a chalky effect.
If you look at the balloons you might wonder, as I did, why only one of the balloons has a basket ...
Thanks to everyone who joined me this week for some crafty fun. I am taking a week off next week but I will share projects with you soon - we will be using Daisy Lane.
Here is a sneaky peak of one of our projects using Pretty Peacock.
Happy crafting!
Susan xx
Thank you so much for looking at my Blog today, if you don't have a Stampin' Up! Demonstrator and you live in the UK, I would love to be yours!
If you need to order any supplies, simply use my “shop with me” button or click on the catalogue links on the right. Alternatively, contact me and I would be happy to place an order for you.
If you would like copies of any of the current catalogues let me know and I will pop them in the post for you. If you prefer, you can view online versions by clicking the links to the right of this post. Brand new 2019/20 Annual Catalogue available now! If you would like a copy and are not already working with a Demonstrator, get in touch and I will pop one in the post for you.
Would you like to receive a FREE gift from me?
All orders placed directly with me or online receive a handmade card from me as a thank you but did you know that all orders over £20 (excluding postage) will receive a gift from me too? If you use the current Hostess Code I will pop something in with your order or post directly to you. (Please remember to allow me to access your contact details otherwise I won't be able to contact you).
This project started with one of the Stitched Nested Labels dies. As with our first project this week, the panel has been stamped with clouds in Balmy Blue ink using second generation stamping.
You can have lots of fun with these balloons changing the colours, adding some bunting or a sentiment (yes they fit perfectly).
The outline of each balloon has been stamped with full strength ink and the infill with second generation ink (stamped off first).
Having a coordinating punch makes it simple to create lots of balloons in no time at all.
The sentiment has been stamped onto a 1 cm strip of card and the ends 'flagged'. A slightly shorter piece of Bermuda Bay mini striped ribbon has been adhered behind using double sided sticky tape and then adhered across the front of the card using dimensionals.
I used a retired heart punch and some sparkle glimmer paper to accent the middle balloon - so pretty!
Love this sentiment - I have a couple of friends with children who are taking or waiting for exam results before heading off (hopefully) to University later this year so this is just perfect.
I used the trio of smaller balloons (and the infill stamps) to create a little scene on the inside of the card and the envelope.
Here is the completed card and envelope.
You may be thinking that you have seen something similar to this project before; if you turn to page 8 in the Annual Catalogue you will see that this project is my version/interpretation of the card shown there - with a few tweaks of course!
Here is the SU original. The background has been stamped with the image of the three smaller balloons in Blushing Bride ink and then a white kraft ink pad has been dragged across to create a chalky effect.
If you look at the balloons you might wonder, as I did, why only one of the balloons has a basket ...
Thanks to everyone who joined me this week for some crafty fun. I am taking a week off next week but I will share projects with you soon - we will be using Daisy Lane.
Here is a sneaky peak of one of our projects using Pretty Peacock.
Happy crafting!
Susan xx
If you need to order any supplies, simply use my “shop with me” button or click on the catalogue links on the right. Alternatively, contact me and I would be happy to place an order for you.
If you would like copies of any of the current catalogues let me know and I will pop them in the post for you. If you prefer, you can view online versions by clicking the links to the right of this post. Brand new 2019/20 Annual Catalogue available now! If you would like a copy and are not already working with a Demonstrator, get in touch and I will pop one in the post for you.
All orders placed directly with me or online receive a handmade card from me as a thank you but did you know that all orders over £20 (excluding postage) will receive a gift from me too? If you use the current Hostess Code I will pop something in with your order or post directly to you. (Please remember to allow me to access your contact details otherwise I won't be able to contact you).
If you are local to me and can collect, I’m happy for you to piggyback one of my orders to save on postage.
If you have any questions, I’m happy to help. You can email me susan_merrey@yahoo.co.uk or telephone 07905 403 823.
Thank you for shopping with me and supporting my business!
Thank you for shopping with me and supporting my business!


Comments
Post a Comment