
Poinsettia Petals - Stamp N' Hop
Hello and welcome to another Stamp 'N Hop Blog Hop. My name is Susan aka Craftyduckydoodah! I have been a self confessed papercraft addict for over 30 years! If you are joining me from Gez Carpenter or starting here with me, grab a cuppa and hop along with us - we have some great projects to inspire you this month using items from the August - December mini catalogue.


I had a project in mind for this hop using a stamp and die bundle called Poinsettia Petals that's part of the Poinsettia Place Suite (page 14).

The Aztecs considered Poinsettia to be symbols of purity. Today, in the language of flowers, Poinsettias are the birth flower for December and symbolise good cheer and success and are said to bring wishes of mirth and celebration.
Personally, I just love the red and green foliage of a Poinsettia but unfortunately I don't seem to be able to keep on going long enough to last through Christmas. However, these lovely stamps and die will enable me to create a whole host of flowers and leaves and I have lots of ideas of how I would like to use them this year.
There are so many fabulous examples of projects for this stunning suite of products that I felt quite overwhelmed.
So, I decided to keep things simple - unfortunately things did not go quite to plan!
Here is my project:

The colours I used:
You will need:
21 cm x 14.5 cm Cherry Cobbler - scored at 10.5 cm
10 cm x 14 cm ww thick - 2 of
Piece of ww thick for stamping and die cutting
The background:
Stamp the sentiment using Memento ink and then die cut the largest Poinsettia.

Whilst photographing the image above I somehow managed to get some inky marks on the card front ... sigh. No time to start again so I would have to find a way to cover the marks. At this point, my idea went out of the window!
Mount the background panel onto the card front using dimensionals.

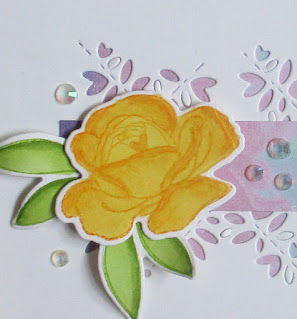
The Poinsettia:
Stamp the Poinsettia using Memento ink, cut out with the coordinating die and colour with Stampin' Blends. I chose not to blend the colours on the petals, I was aiming for a sort of sketchy, textured look.

In an attempt to cover the inky splodges I also stamped and die cut three holly leaves which have also been coloured with Stampin' Blends.
To Assemble:
Curl and shape the holly leaves and then adhere between the petals using Tombow on just the end of each leaf. If necessary, you can also add a mini dimensional to help the leaves keep their shape.

Use a double layer of dimensionals to adhere the Poinsettia.
I added one of these gorgeous Beaded Pearls to the centre adhering with Tombow.

The inside/envelope:
I stamped a partial image in the corner of the second ww panel using Memento ink and coloured with Stampin' Blends. Adhere to the inside using double sided tape.I used Mango Melody for the centre. I also stamped and coloured a Poinsettia in the corner of the envelope.
Top Tip
If you are using Stampin' Blends to colour images on an envelope don't forget to place a piece of scrap card or paper on the inside whilst you colour. These lovely pens are so juicy that that will show through the other side of the envelope if you don't!

The completed project:

As I mentioned my project did not got at all to plan; I guess I will just have to save that idea for another day!
Next up is Rochelle in Australia - I wonder which stamp set she has chosen to use?

Thanks for hopping along with us.
Stay safe and well wherever you are in the World.
Susan xx
If you have any questions, or need help with anything I’m always happy to help. You can email me susan_merrey@yahoo.co.uk or telephone 07905 403 823 during normal working hours.
If you need to order any supplies, simply use my “shop with me” button or click on the catalogue links on the right. Alternatively, contact me and I would be happy to place an order for you.
If you would like a copy of either of the current Annual Catalogue let me know and I will pop one in the post for you. If you prefer, you can view an online version by clicking the link to the right of this post. Also, the August - December mini catalogue will be available very soon - if you would like a copy of either catalogue, let me know!


Thank you for shopping with me and supporting my business.


Love it Susan. Your "cover up" was a great "cover up" lol. Thanks for hopping with us @ Stamp 'n Hop.
ReplyDeleteThanks Vicky - I don't like to admit defeat with a project!
DeleteGreat card, Susan. Thanks for showing us how you put it together. Thanks for sharing.
ReplyDeleteThanks Libby - not quite how I imagined my project but it sort of works!
DeleteLove your understated card Susan, it looks so fresh. Using the negative piece is cute as well x
ReplyDeleteThanks Mo xx
DeleteI'm starting to think I NEED this bundle - I love your blending!
ReplyDeleteThanks Kim, I think it is a very versatile stamp set - you do need it!
DeleteSo pretty. Great colouring too.x
ReplyDeleteThanks Stacey xx
DeleteI love your tip about colouring the envelopes. A lovely card, thanks for sharing
ReplyDeleteThank you Vickie.
DeleteLovely card Susan, love this idea :-)
ReplyDeleteThank you, not quite how I planned it though but was quite pleased with it eventually!
DeleteThis is a nice card.
ReplyDeleteThank you!
DeleteThis is stunning for a mistake! I wish my mess ups could turn out this great!
ReplyDeleteThanks Jen.
DeleteA beautiful clean card, love it, thanks for sharing x
ReplyDeleteThanks Jo, great hopping with you again! xx
Delete