Brilliant Wings - Colour Combo Blog Hop
Hello and welcome to another Colour Combo Blog Hop. If you are starting here with me or have hopped over from Rochelle Laird-Smith, welcome we have lots of lovely projects to share with you this month.
Under normal circumstances I would not put these three colours together but that is the point of the colour combo challenge and, I do enjoy a challenge!
I decided to use a die set call Brilliant Wings for my project. The beautiful Butterfly Bouquet suite launched last week ahead of the upcoming Annual Catalogue. I am using the lovely Brilliant Wings dies for my project and, I have used them lots already.
These dies are so versatile; you have the option of simple die cut butterfly shapes, intricate detailed butterfly wings or you can layer both styles to create wonderful 3D dimension. I haven't had chance to play with the background accent dies yet but I will!
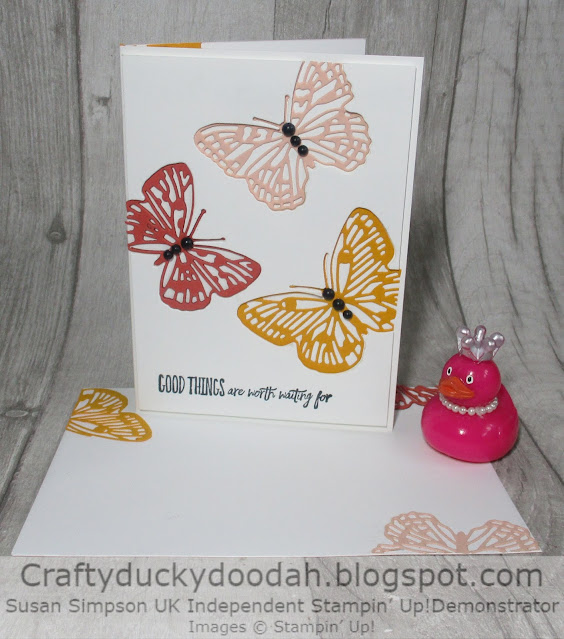
Here is my project:
As I was not too keen on the combo colours I decided to create a project with lots of white space using a simple inlaid die cutting technique.
You will need:
21 cm x 14 cm BWT - scored at 10.5 cm
10 cm x 14 cm BWT
Small pieces card in the challenge colours for die cutting
The background:
Stamp a sentiment onto the BWT panel using Memento ink. Position the butterfly dies and cut out. I quite like the effect created by placing the dies over the edge of the card but if you prefer, you could always die cut complete butterflies.
The die cutting:
Cut out two butterflies from each colour.
To assemble:
Adhere the die cut panel to the card base using dimensionals.
Use lots of dimensionals to support all areas of the die cut panel. Snip tiny pieces so that all the delicate areas around the attennae for example are well supported. If you don't these areas will 'sink' when you assemble the card.
Adhere the butterflies using tiny dabs of Tombow and press down firmly. Carefully trim off any overhanging pieces of the butterflies. I then added some of my new favourite embellishments along the body of each butterfly using different sized dots for added interest.
The inside/envelope:
Using the spare butterflies, position partial die cuts around the edges of the inside and adhere with tiny dabs of Tombow. Trim off overhanging edges.
The completed project:
Once my project was complete and I had corrected my mistake (see below) I decided that I actually quite liked the colour combo after all - go figure!
The details:
Spot the mistake! Due to me placing a scrap of card in the wrong file pocket my project initially used Cajun Craze instead of Terracotta Tile. Only when I had finished my project did I realise something was wrong. I cut some more butterflies in the correct colour and carefully adhered on top of the Cajun Craze ones. Obviously, I removed the black dots from the body of the butterfly first - hopefully no one will notice the double layers!
I will be making more versions of this project using different colours. I will also try a version where just the body of the butterfly is adhered with the wings curled and lifted for a different effect,
Thanks for hopping along with us, next up is Elisabeth Pirolt - I can't wait to see what she did with this colour combo.
Susan xx
All orders placed directly with me or online receive a handmade card from me as a thank you but did you know that all orders over £25 (excluding postage) will receive a gift from me too? If you use the current Shopping Code I will pop something in with your order or post directly to you. (Please remember to allow me to access your contact details otherwise I won't be able to contact you).
If your order is over £150 please don't use the code as you will receive your own Stampin' Rewards. You will still receive a card and a gift from me. If you are local to me and can collet, I'm happy for you to piggyback one of my orders to save on postage.
Thank you so much for looking at my Blog today, if you don't have a Stampin' Up! Demonstrator and you live in the UK, I would love to be yours!
If you need to order any supplies, simply use my “shop with me” button or click on the catalogue links on the right. Alternatively, contact me and I would be happy to place an order for you.
If you would like a copy of either of the current Annual Catalogue or the current Mini Catalogue let me know and I will pop one in the post for you. If you prefer, you can view an online version by clicking the link to the right of this post.
If you would like a copy of either of the current Annual Catalogue or the current Mini Catalogue let me know and I will pop one in the post for you. If you prefer, you can view an online version by clicking the link to the right of this post.
Would you like to receive a FREE gift from me?
If your order is over £150 please don't use the code as you will receive your own Stampin' Rewards. You will still receive a card and a gift from me. If you are local to me and can collet, I'm happy for you to piggyback one of my orders to save on postage.
Thank you for shopping with me and supporting my business.


Absolutely stunning, wasn't my favourite colour combo either, love what you have done. Love the butterflies, on my wish list :-)
ReplyDeleteThank you - you definitely need the butterflies!
DeleteThis card is very nice
ReplyDeleteThank you Sonja.
DeleteGreat card Susan, love the inlaid butterflies x
ReplyDeleteThanks Mo xx
DeleteGreat idea! Love the effect of the die cuts
ReplyDelete