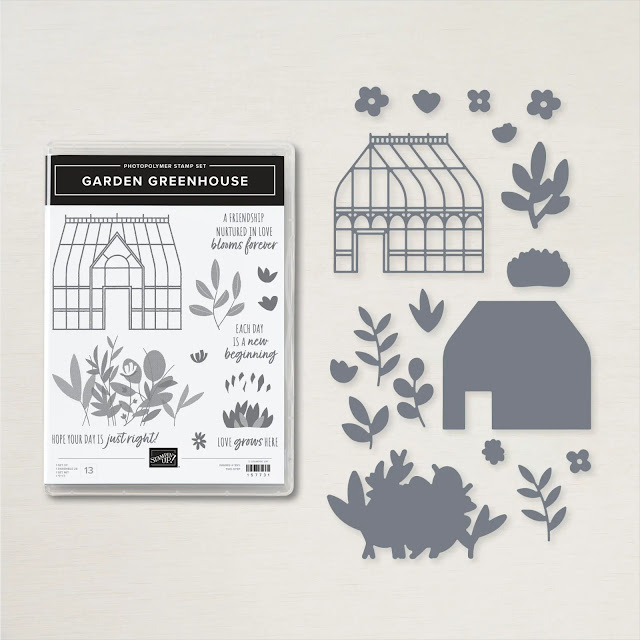
Hello and welcome to another Kre8tors Blog Hop! This month we have a free choice for our projects meaning we can do anything we like! I will be using a bundle called Garden Greenhouse for my project.
If you have hopped over from Rebecca Jo or you are starting our hop here with me at Craftyducky HQ we have lots of great projects to share with you this month.I decided to use the Garden Greenhouse bundle for my project - I really haven't used this bundle enough; it's been sat on my 'to use' pile for some time and this is the first time I have played with it! This bundle (10% bundle saving) will be leaving us soon and is only available whilst stocks last. At the time of writing this post Garden Greenhouse is still available.
My favourite thing about this bundle is the greenhouse; there is so much detail on it, I also like the flowers and the foliage that can be stamped in many different colours to create different blooms.
Here is my project:
A cute little gift box just waiting to be filled with some goodies!
You will need:
22.4 cm x 7.5 cm Smoky Slate
You will also need pieces of Smoky Slate and Basic White Thick (BWT) for stamping and die cutting.
The box:
Score the piece of Smoky Slate at 4cm on the short edge. Score on the long edge at 7.2 cm, 10.7 cm, 17.9 cm and 21.4cm.
Crease all the folds with a bone folder and cut as shown below. The 3.5 cm side is the bottom of the box.
I used Tombow to assemble the base; first folding and adhering the little tab to form the box itself and then folding in the bottom pieces, gluing as I went.
The die cutting:
I used Smoky Slate card to cut out two of the greenhouse detail dies and two of the greenhouse bases (one from Smoky Slate and the other from BWT).
The stamping and die cutting:
I used Pear Pizzazz and Granny Apple Green ink to stamp 2 bushes and two of the leaf sprigs. I then used the coordinating dies to cut them out.
I stamped an assortment of flowers using Melon Mambo ink and cut out with the coordinating dies.
To assemble:
Using tiny dabs of Tombow I adhered the two Smoky Slate greenhouse detailed pieces together.
Top Tip #1
I used two die cuts to give the finished piece more strength as the die is very detailed and therefore a little flimsy for this project.
Adhere the Smoky Slate detail die cut to the BWT base
Adhere the Smoky Slate greenhouse base to the back of the box and the BWT piece to the front.
Top Tip #2
Think about where you don't want the glue i.e. in the doorway!
I then added the greenery using a combination of Tombow and dimensionals. I curled the leaves of the sprigs to add dimension.
The flowers have also been added using a combination of Tombow and dimensionals. I added a couple of jewels to the centre of some of the flowers for a bit of sparkle.
The sentiment has been stamped onto a scrap of BWT card with Melon Mambo ink and adhered with mini dimensionals.
The completed project:
The finished box measures 3.5 cm x 7.2 cm and would make a perfect little gift for gardening friends. I filled a treat bag with Easter chocolates and tied with a piece glittered ribbon and popped inside the box.
I travelled up to Leeds yesterday for a restorative haircut and popped in for a cuppa with a friend on the way home. My friend has just bought a new greenhouse so this little treat was the perfect gift for her!
Next up is Melissa who has another great project to share. Thanks for hopping along with us, don't forget to leave comments to let us know what you think of our projects.
If you get lost along the way a list of participants can be found below.
Susan xx
Roll Call List
If you need any advice before placing an order or you have any crafty questions, please get in touch - I'm always happy to help. You can email me susan_merrey@yahoo.co.uk or telephone 07905 403 823 during normal working hours, if I can't get to the phone, please leave a message.
Thank you so much for looking at my Blog today, if you don't have a Stampin' Up! Demonstrator and you live in the UK, I would love to be yours!
If you need to order any supplies, simply use my “shop with me” button or click on the catalogue links on the right. Alternatively, contact me and I would be happy to place an order for you.
If you would like a copy of the either the current Annual Catalogue or the January - June mini catalogue just let me know and I will pop one in the post for you. If you prefer, you can view an online version by clicking the link to the right of this post. Orders placed either in my online store or directly with for me £25+ (excluding P & P) will receive a handmade card and a gift as a thank you from me.


Susan, WOW! This project is incredible! I will admit I wasn't sure what I could do with this set when I saw it, but you may have just convinced me!! Melissa
ReplyDeleteThank you Melissa, the measurements were a bit tricky to work out but my friend was thrilled with her gift so worth the effort!
DeleteCute greenhouse Susan, Thanks for sharing.
ReplyDeleteYour gift box is gorgeous, Susan! Thanks for sharing!💕
ReplyDeleteSuch a great project!!
ReplyDeleteSuch a fab project xx
ReplyDelete